Setting Up A ReadingRecord Site
This document outlines how to setup a ReadingRecord site using the fictitious “Demo Library”. Examples & screenshots are included where useful.
IMPORTANT: If creating your own Demo Library site, you can use 'demo' as the host name, but you will need to use your library's DNS domain in place of '.readingrecord.org'. When applicable, text will be enclosed in square brackets & [highlighted in yellow].
Forms Review
The Demo Library has 3 programs: Kids, Teens & Adults. They have submitted the following forms & included a library banner, so it looks like we have everything we need.
- Demo Library setup form.
- Demo Library kids program customization form.
- Demo Library teens program customization form.
- Demo Library adults program customization form.
DNS Record
ReadingRecord requires a valid DNS address (A) record to function. Reverse (PTR) records are optional. Depending on your network configuration, you may need both internal and external DNS records. Please note that external DNS records can take awhile to propagate.
- The Demo Library has chosen the URL of 'demo.readingrecord.org'. Internal & external DNS records have been added & tested. [Use your own DNS domain, eg: 'demo.mydomain.org']
Create Databases
Next we need to create databases. Since the Demo Library has 3 programs, we will need 1 config database & 3 program databases. You will need to decide on a DB prefix. In most cases the host portion of the URL is used, so we'll use 'demo' for the Demo Library.
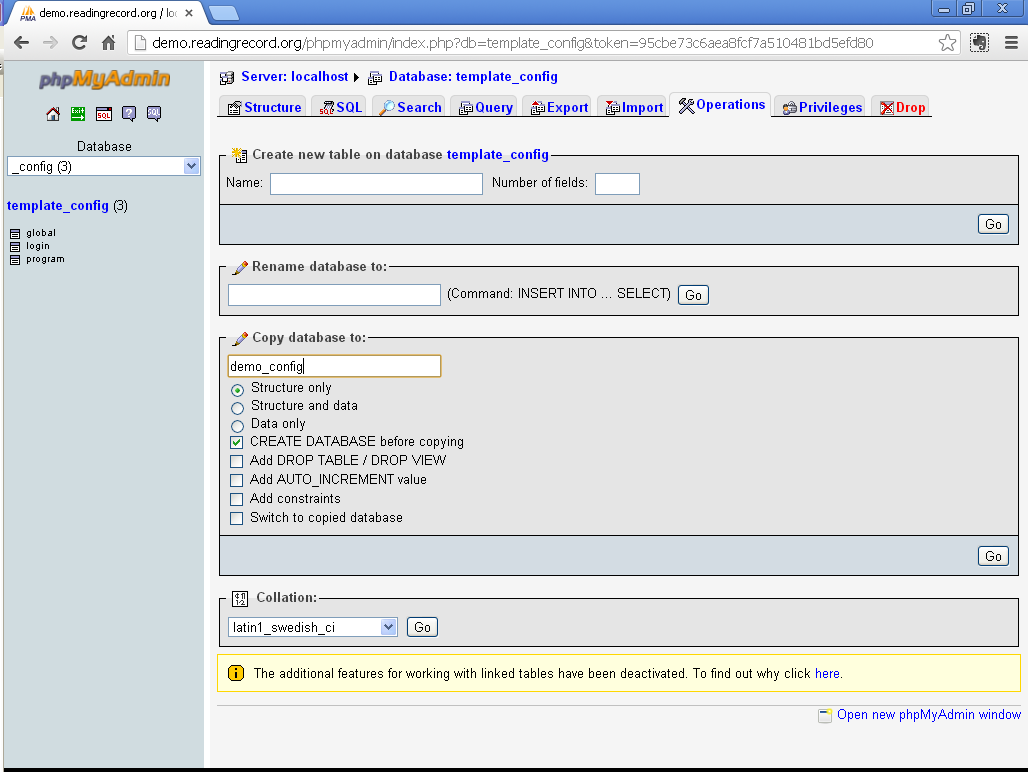
- Using phpMyAdmin, copy the 'template_config' DB to 'demo_config', selecting “Structure only”:
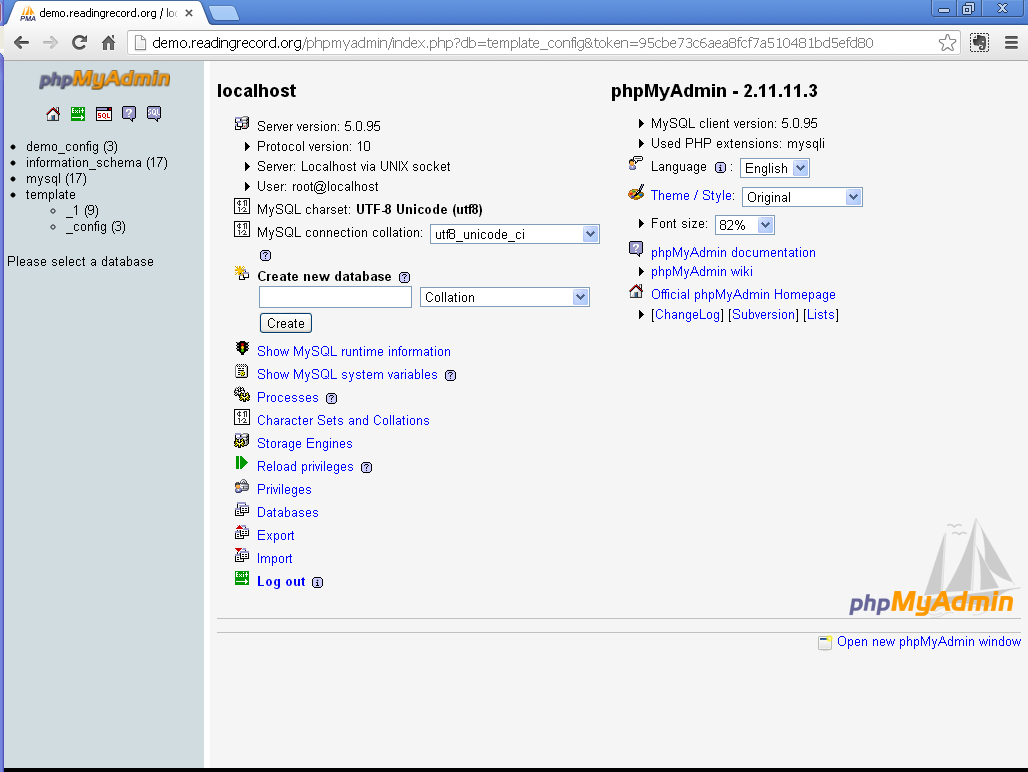
- When successful, you'll see the 'demo_config' DB listed in phpMyAdmin:
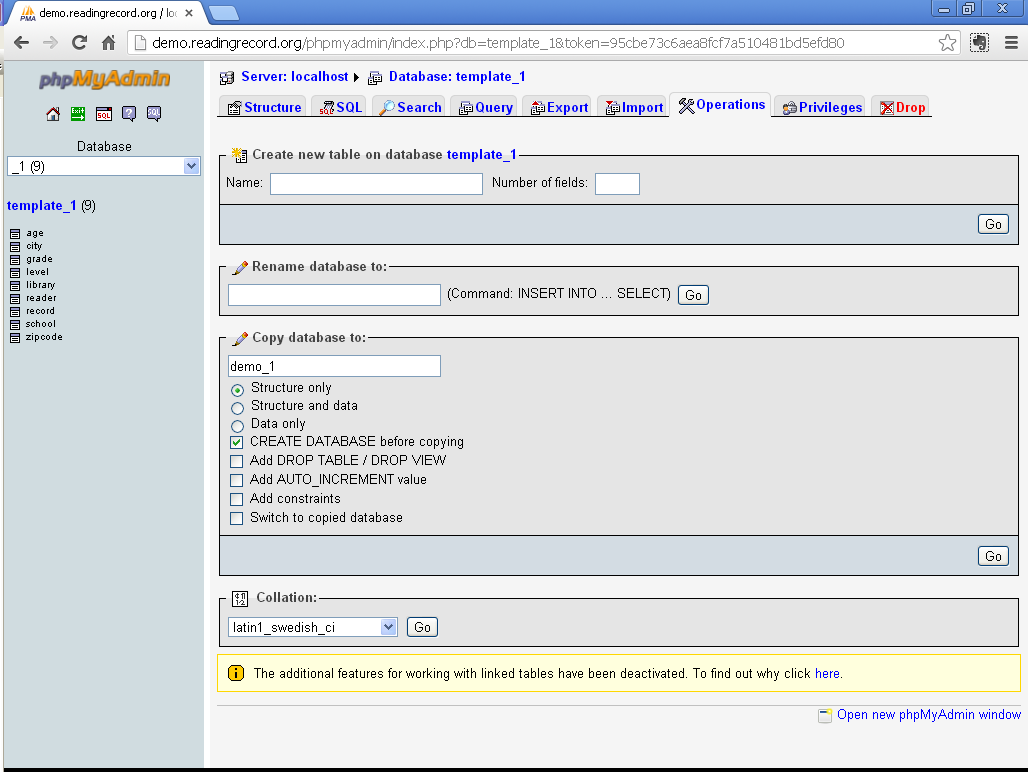
- Now copy the 'template_1' DB to 'demo_1', selecting “Structure only”:
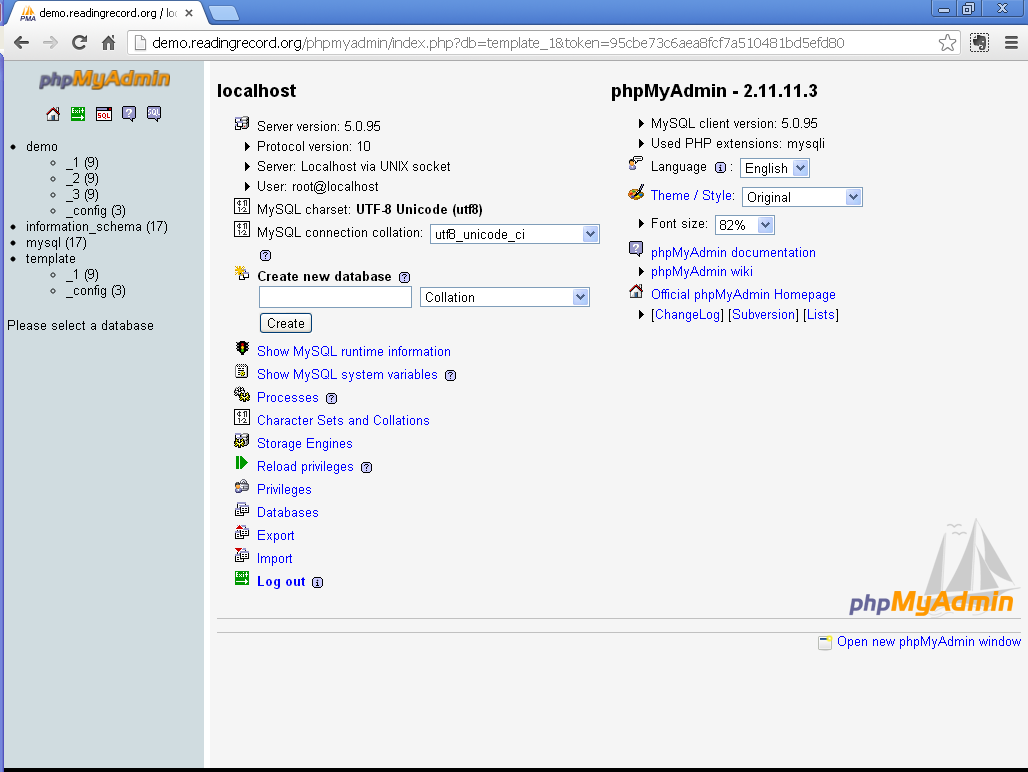
- Using the same procedure, copy the 'template_1' DB to 'demo_2' and 'demo_3'. When finished, you should see the 'demo_1', 'demo_2', 'demo_3' & 'demo_config' databases listed:
Create MySQL User
Now we need to create a MySQL user account with appropriate privileges. You will need to decide on a MySQL username. This account will not be used by staff, but rather by ReadingRecord to add, update & delete records. In most cases the host portion of the URL is used, so we'll use 'demo' for the Demo Library.
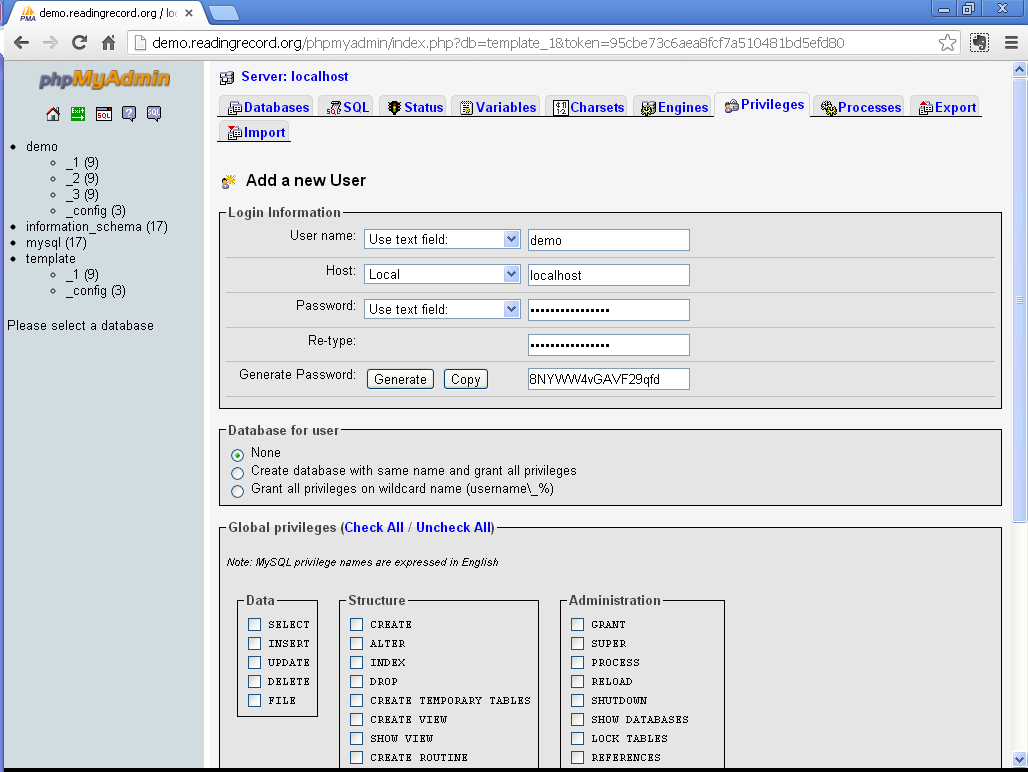
- Using phpMyAdmin, create a new user account. You may let phpMyAdmin generate a password (shown) or use your own. Either way be sure to copy the password, it will be needed in the next step (No, I did not use the password shown!
 ):
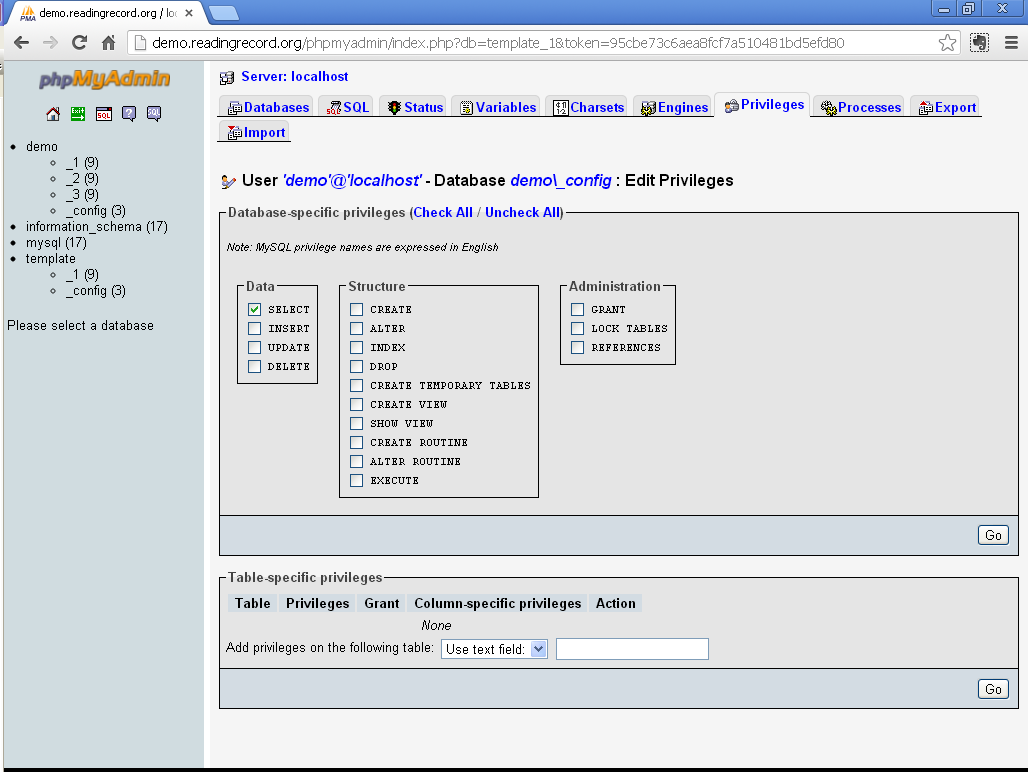
): - Using phpMyAdmin, set privileges for the account. It will need SELECT on the 'demo_config' DB:
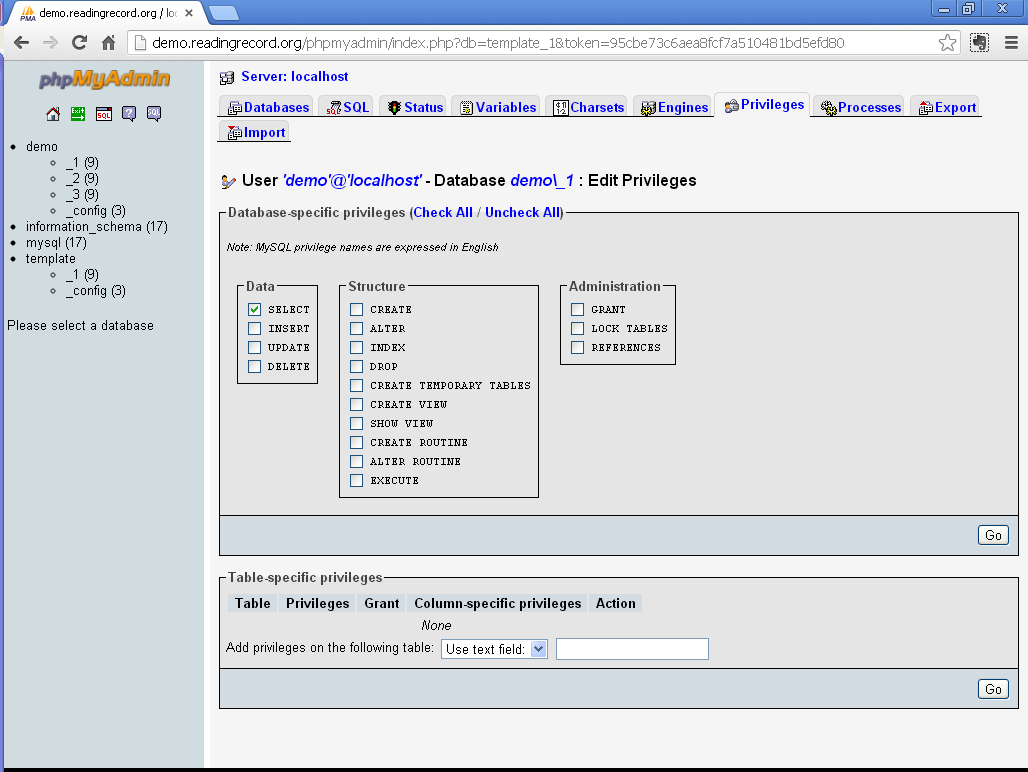
- The account will also need SELECT on DBs 'demo_1', 'demo_2' & 'demo_3'. Screenshot is of 'demo_1', repeat for 'demo_2' & 'demo_3':
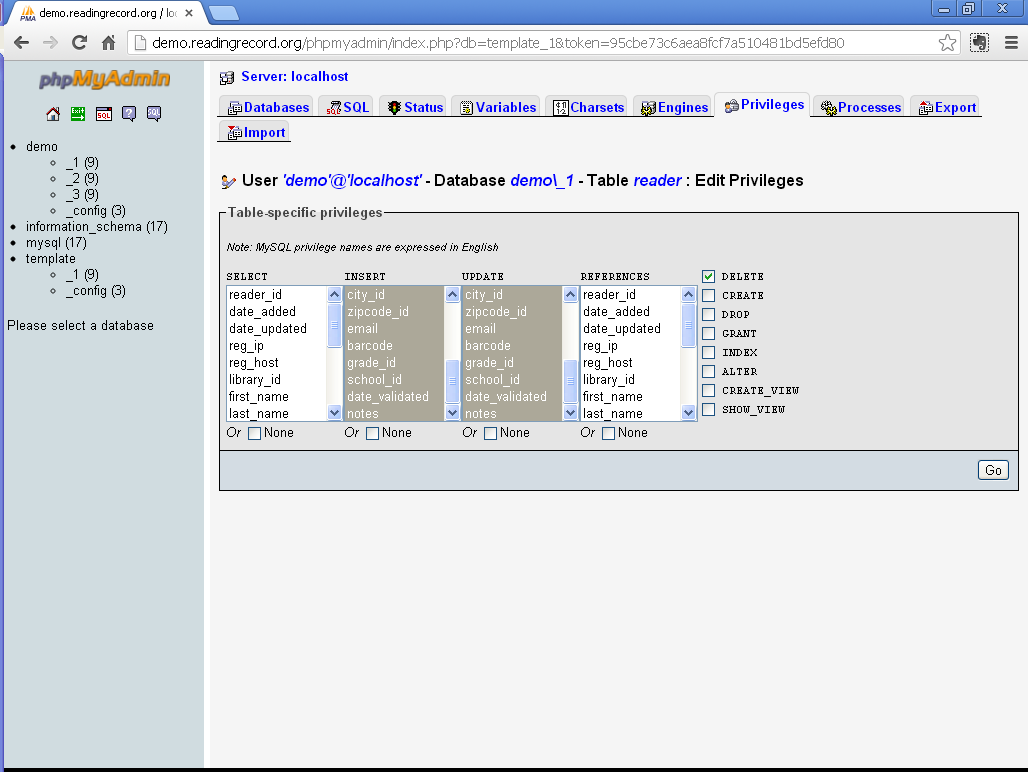
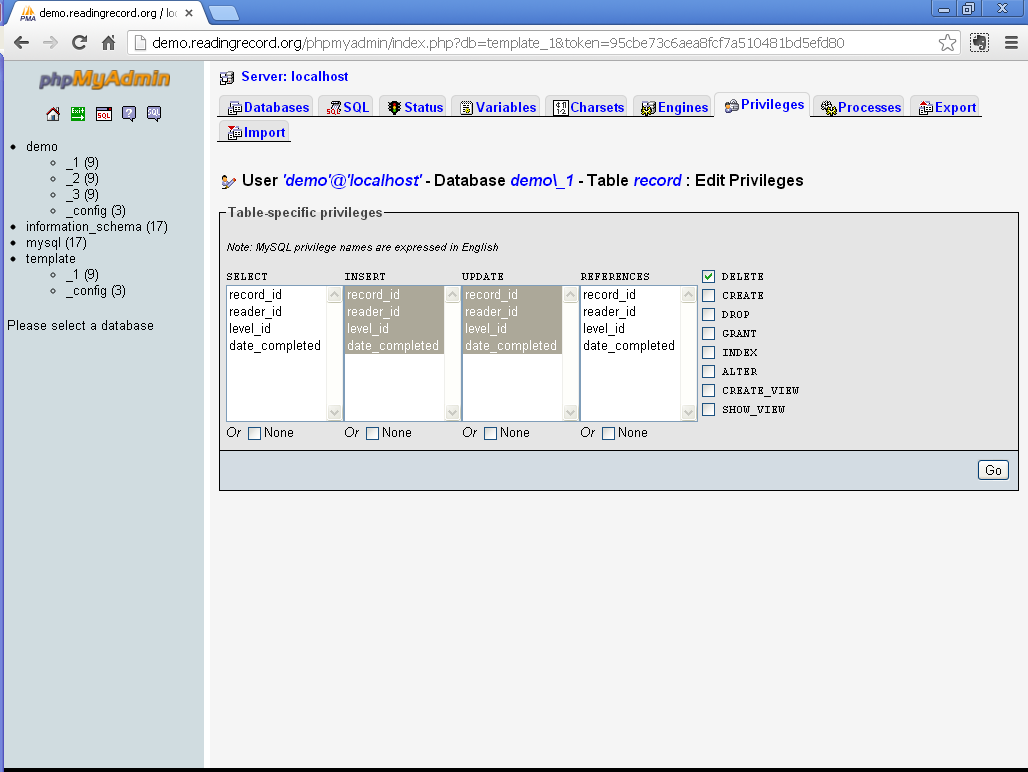
- The account also needs INSERT, UPDATE & DELETE on both the 'reader' & 'record' tables (Be sure to select all items in the INSERT & UPDATE boxes as well as clicking the DELETE checkbox). Screenshots are for the 'demo_1' DB, repeat for 'demo_2' & 'demo_3':
- Once privileges are correct for all databases, click the “Reload privileges” link.
Create The Config File
ReadingRecord uses a config file to provide MySQL database information & credentials. The name of the config file must match the full URL for the site plus '_config.php'. For the Demo Library the file name is 'demo.readingrecord.org_config.php'. Copy the file 'ReadingRecord/config/SAMPLE.readingrecord.org_config.php' to 'ReadingRecord/config/demo.readingrecord.org_config.php' [Use your own DNS domain to create the config file, eg: 'demo.mydomain.org_config.php'].
- Now we'll edit the config file, providing database information & credentials by changing the values of:
- $configGlobal['dbUser'] The MySQL user account we created.
- $configGlobal['dbPasswd'] The MySQL user password.
- $configGlobal['dbConfig'] The MySQL database we created.
The finished config file looks like this:
<?php


/*
Copyright (C) 2012, 2013 by the Free Software Foundation, Inc. http://www.fsf.org/

This file is part of ReadingRecord.
Created & developed by Eric Sisler <lbylnxgek@gmail.com>

ReadingRecord is free software: you can redistribute it and/or modify
it under the terms of the GNU Affero General Public License as published by
the Free Software Foundation, either version 3 of the License, or
(at your option) any later version.

ReadingRecord is distributed in the hope that it will be useful,
but WITHOUT ANY WARRANTY; without even the implied warranty of
MERCHANTABILITY or FITNESS FOR A PARTICULAR PURPOSE. See the
GNU Affero General Public License for more details.

You should have received a copy of the GNU Affero General Public License
along with ReadingRecord. If not, see http://www.gnu.org/licenses/.
*/

// Subversion: $Id: SAMPLE.readingrecord.org_config.php 448 2013-01-04 04:17:42Z esisler $

//
// Global configuration.
// NOTE: Most global & program configuration setting contained in the
//       global & program databases.
//

// Credentials for database access.
$configGlobal['dbHost'] = 'localhost';
$configGlobal['dbUser'] = 'demo';
$configGlobal['dbPasswd'] = '8NYWW4vGAVF29qfd';
$configGlobal['dbConfig'] = 'demo_config';

//
// End global configuration.
//

?>
Add The Library Banner
Currently the library / program banner is a separate file rather than contained within the ReadingRecord database. This will (hopefully) be fixed in a future release.
- Create a directory & copy the Demo Library's banner, which appears on the patron self-registration screens. Normally the directory matches the full URL, so create the directory 'html/images/demo.readingrecord.org/' and copy the banner there. [Use your own DNS domain as the name of the directory, eg: 'demo.mydomain.org']
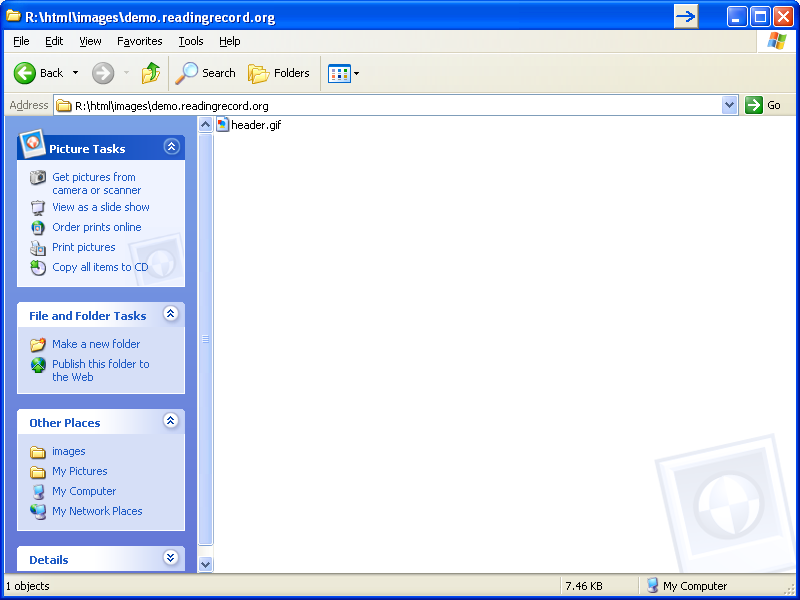
- Copy the file to the directory. The file must be in GIF format and the file name must be 'header.gif':
- Note: I used a sample graphic for the banner, which contains some suggestions about what you might use for the actual banner:
Configure Global Options
Now it's time to configure site-wide options, which are contained in the 'demo_config.global' table. The Demo Library submitted 1 setup form & 3 program customization spreadsheets, which we will use to set options in this and other tables.
- Using phpMyAdmin, select the 'demo_config.global' table, which should be empty.
- Insert a new record, MySQL will pre-populate some of the fields.
- Based on forms submitted by the Demo Library, we will change some of the values:
- globalId: Leave this field blank, it will be automatically populated by MySQL when the record is saved.
- IMPORTANT: Once the record is saved, the globalId must be '1'.
- siteHost: This field is reserved for future development.
- indexStart: Eventually we'll want to change this to match the date self-registration should begin, but for now we want to be able to see the patron self-registration pages, so leave it as '2013-01-01'.
- indexEnd: Patron self-registration for all programs ends on August 3rd, so change this field to '2013-08-03'.
- pageTitle: Change to 'Demo Library - ReadingRecord'.
- libraryName: Change to 'Demo Library'.
- hostDateOffset: This field is only used when the ReadingRecord server is in a different timezone than the library, so leave as '0'.
- imageDir: Change to the directory we created for the banner graphic 'demo.readingrecord.org'. [Use your own DNS domain as the name of the directory, eg: 'demo.mydomain.org']
- bodyColor: Controls the background color. Leave as-is.
- hrOpts: Changes the width & color of some HTML horizontal rule tags. Leave as-is.
- allowDups: The library does not wish to allow duplicate registrations between programs, so set to '0'.
- enable1: Program 1 is enabled, so leave as '1'.
- enable2: Program 2 is enabled, but we are only configuring the Kids program for now, so leave as '0'.
- enable3: Program 3 is enabled, but we are only configuring the Kids program for now, so leave as '0'.
- enable4: Program 4 is disabled, so leave as '0'.
- enable5: Program 5 is disabled, so leave as '0'.
- enable6: Program 6 is disabled, so leave as '0'.
- db1: Change to the name of the database for program 1, 'demo_1'.
- db2: Program 2 is enabled, but we are only configuring the Kids program for now, so leave blank.
- db3: Program 3 is enabled, but we are only configuring the Kids program for now, so leave blank.
- db4: Program 4 is disabled, so leave blank.
- db5: Program 5 is disabled, so leave blank.
- db6: Program 6 is disabled, so leave blank.
 : Full list of DB fields
Add Staff Accounts
Per the setup form, the Demo Library has 2 accounts for accessing ReadingRecord: One for staff & one for volunteers.
- Using phpMyAdmin, select the 'demo_config.login' table and insert 2 records:
- Record #1. This account will be used by library staff & includes access to reports:
- login_id: Leave blank, MySQL will populate the field when the record is saved.
- user_name: 'staff'.
- password: 'Staff2013'.
- real_name: 'Staff'.
- reports_access: '1'.
- Record #2. This account will be used by library volunteers & does not have access to reports:
- login_id: Leave blank, MySQL will populate the field when the record is saved.
- user_name: 'volunteer'.
- password: 'Helper!'.
- real_name: 'Volunteer'.
- reports_access: '0'.
Configure Program Options
Next we need to configure program options, starting with the kids program.
- Using phpMyAdmin, select the 'demo_config.program' table, which should be empty. Insert a new record, MySQL will pre-populate some of the fields. Based on forms submitted by the Demo Library, we will change some of the values:
- progId: Leave this field blank, it will be automatically populated by MySQL when the record is saved.
- IMPORTANT: Once saved, the progId must match the values of 'enableN' & 'dbN' in the 'config.global' table. For example:
- progId 1 corresponds with 'enable1' & 'db1'
- progId 2 corresponds with 'enable2' & 'db2'
- regStart: As with the indexStart field of the global table, eventually we'll want to change this to match the date self-registration should begin, but for now we want to be able to see the patron self-registration pages, so leave it as '2013-01-01'.
- regEnd: Self-registration ends on 8/3, so change to '2013-08-03'.
- altURL: This field is only used when ReadingRecord should provide a different URL for program information/registration, so leave it blank.
- longPgrmName: From tab 2 of the kids customization spreadsheet, change to 'Dig Into Reading'.
- shortPgrmName: Change to 'Kids'.
- pgrmRange: Also from tab 2, change this to 'Ages Birth-11 years'.
- pgrmInfo: Change to 'Earn prizes for reading books and doing library related activities June 1-August 3. Reading logs to keep track of books read and instructions for the program are available at any Demo Library Children's desk.'.
- useLibrary: There are branches listed on tab 4, so leave as '1'.
- libraryLabel: No label customization was indicated on tab 3, so leave as-is.
- usePersonalHeader: In most cases this header is used, so leave as '1'.
- personalHeaderLabel: No label customization on tab 3, so leave as-is.
- firstNameLabel: Use the custom label 'Child's First Name:' as indicated on tab 3.
- lastNameLabel: Use the custom label 'Child's Last Name:', also indicated on tab 3.
- phoneDigits: Per the global setup form, leave the default of 10.
- phoneError: Leave as-is.
- phoneAreaCode: Per the global setup form, the phone number field should not be pre-populated with an area code, so leave blank.
- useAge: There are ages listed on tab 7, so leave as '1'.
- ageLabel: No label customization on tab 3, so leave as-is.
- useBdate: Per tab 2, the birth date field will not be used, so change to '0'.
- requireBdate: Birth date field unused, so leave as-is.
- bdateLabel: Birth date field unused, so leave as-is.
- useGender: Genders are listed on tab 8, so leave as '1'.
- genderLabel: No label customization on tab 3, so leave as-is.
- useCity: Cities are listed on tab 5, so leave as '1'.
- cityLabel: No label customization on tab 3, so leave as-is.
- useZipcode: No zipcodes listed on tab 6, so disable this field by changing to '0'.
- zipcodeLabel: Zipcode field unused, so leave as-is.
- useEmail: Per tab 2, the e-mail field will not be used, so change to '0'.
- requireEmail: Email field unused, so leave as-is.
- emailLabel: Email field unused, so leave as-is.
- useBarcode: per tab 2, the barcode field will not be used, so change to '0'.
- requireBarcode: Barcode field unused, so leave as-is.
- barcodeLabel: Barcode field unused, so leave as-is.
- useSchoolHeader: The grade field won't be used but the school field will, so leave as '1'.
- schoolHeaderLabel: No label customization on tab 3, so leave as-is.
- useGrade: No grades listed on tab 9, so disable this field by changing to '0'.
- gradeLabel: Grade field unused, so leave as-is.
- useSchool: Schools listed on tab 10, so leave as '1'.
- schoolLabel: No school label customization on tab 3, so leave as-is.
- useGuardianHeader: Per tab 2, guardian name will be tracked, so we want the header as well. Leave as '1'.
- guardianHeaderLabel: No label customization on tab 3, so leave as-is.
- useGuardianFirstName: Per tab 2, guardian name will be tracked, so leave as '1'.
- requireGuardianFirstName: Per tab 2, guardian name is required, so leave as '1'.
- guardianFirstNameLabel: No label customization on tab 3, so leave as-is.
- useGuardianLastName: Per tab 2, guardian name will be tracked, so leave as '1'.
- requireGuardianLastName: Per tab 2, guardian name is required, so leave as '1'.
- guardianLastNameLabel: No label customization on tab 3, so leave as-is.
- useGuardianPhone: Per tab 2, guardian phone unused, so change to '0'.
- requireGuardianPhone: Guardian phone unused, so leave as-is.
- guardianPhoneLabel: Guardian phone unused, so leave as-is.
- useGuardianEmail: Per tab 2, guardian e-mail unused, so change to '0'.
- requireGuardianEmail: Guardian e-mail unused, so leave as-is.
- guardianEmailLabel: Guardian e-mail unused, so leave as-is.
- useGuardianBarcode: Per tab 2, guardian barcode will be tracked, so leave as '1'.
- requireGuardianBarcode: Guardian barcode optional, so change to '0'.
- guardianBarcodeLabel: No label customization on tab 3, so leave as-is.
- useConsent: Per tab 2, consent field will be used, so leave as '1'.
- requireConsent: Consent field required, so leave as '1'.
- consentLabel: No label customization on tab 3, so leave as-is.
- consentInfo: No info customization on tab 3, so leave as-is.
- consentError: No error customization on tab 3, so leave as-is.
- regSuccessMssg: Per tab 2, change to 'You may pick up the instructions for the program and your reading log to keep track of your books at any Demo Library Children's area beginning June 1.'
Populate Tables For Drop-Down Lists
Next we'll populate the tables used to create drop-down lists on the registration form. This procedure is used for the following fields:
- Age
- City
- Gender
- Grade
- Library
- School
- Zipcode
The Demo Library has chosen to track the age, city, gender, library (branch) & school fields for their Kids program.
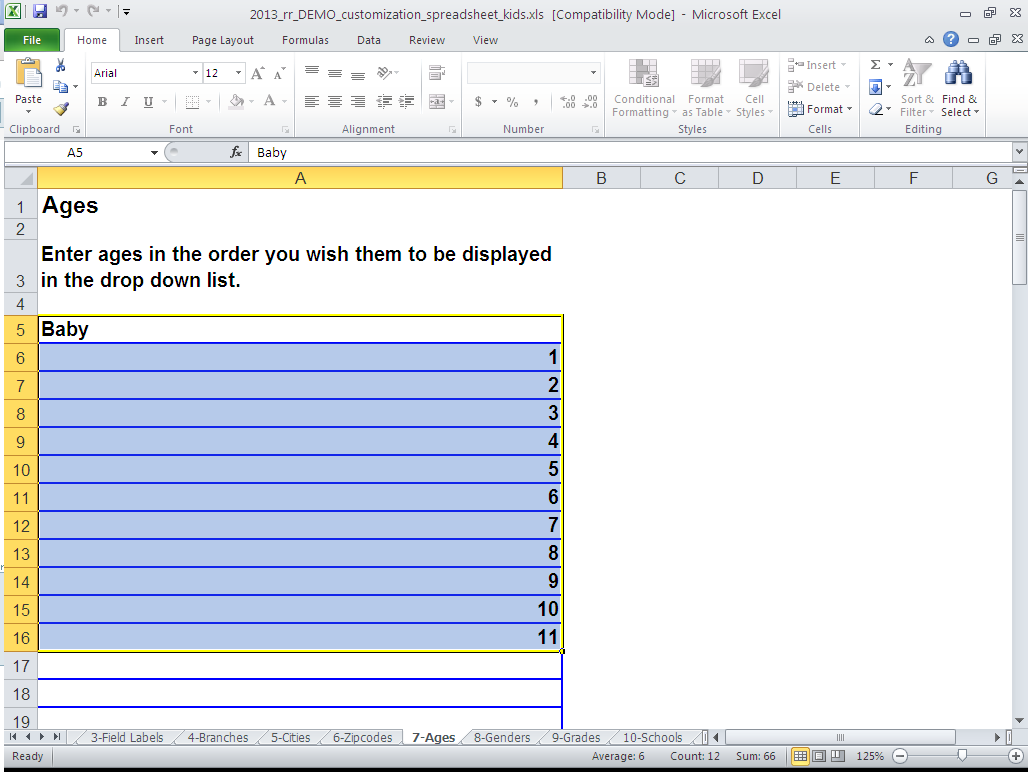
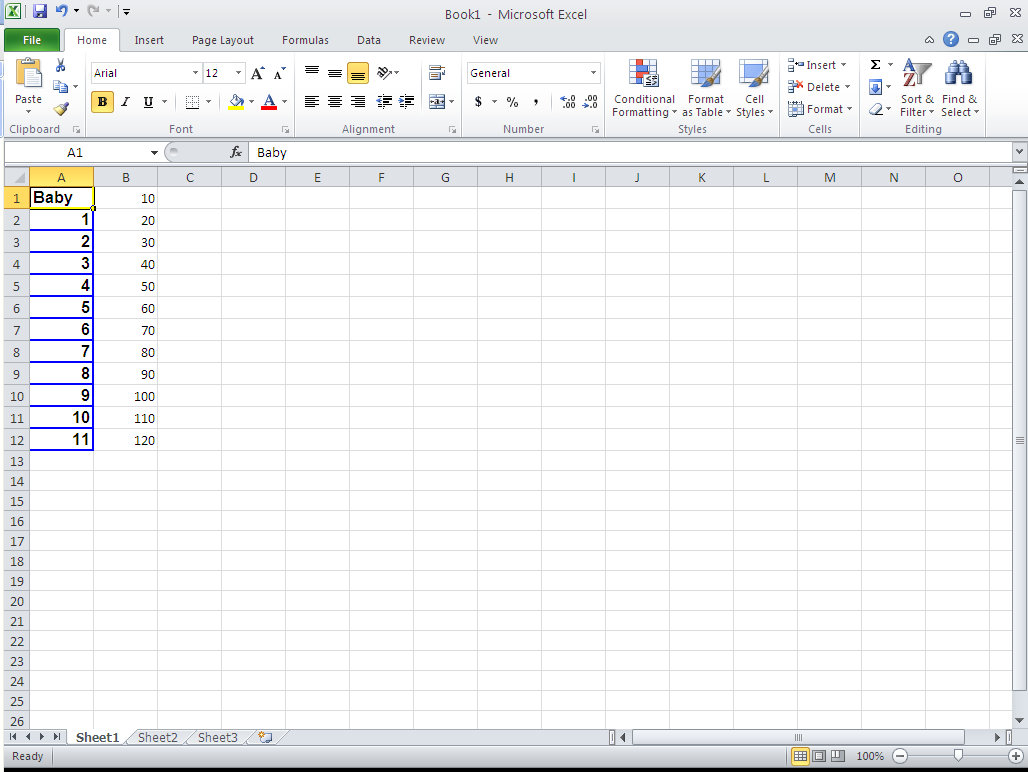
- First we will convert the 'Ages' spreadsheet tab into CSV data, which can then be imported into MySQL. Select (highlight) all the ages listed from the ages tab:
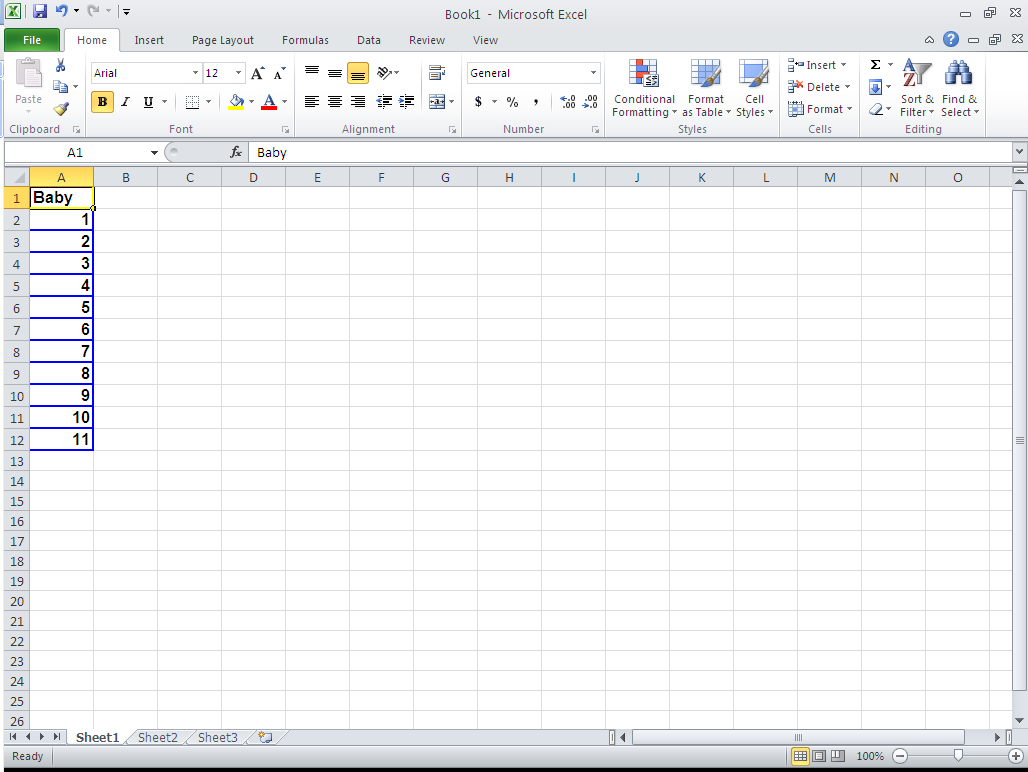
- Copy the selection, then select file → new → blank workbook. Paste the data into the new spreadsheet:
- Drop-down lists require a sort order (more on that later), so we'll add that data to column B:
- Select File → Save As. Name the file 'ages' & change the “Save as type:” to “CSV (Comma delimited) (*.csv)”.
- If you receive warnings about multiple sheets, click “OK”.
- If you receive warnings about incompatible features, click “Yes”.
- Close the CSV file
- If you receive warnings about saving the file, click “Don't Save”.
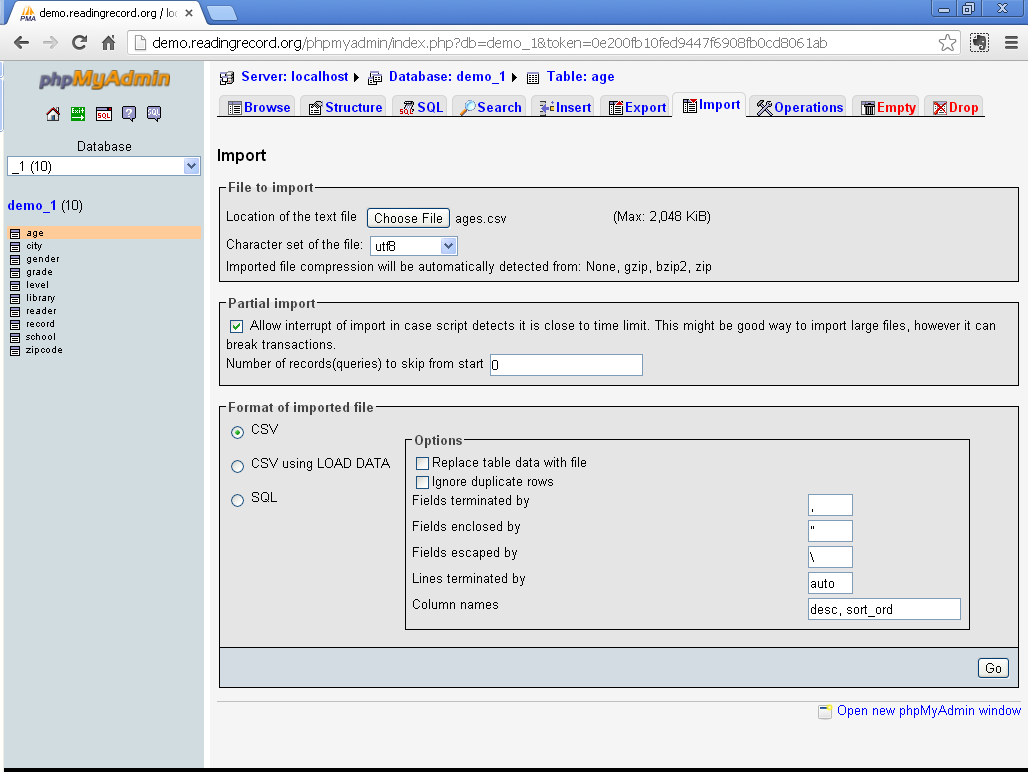
- Now we're ready to import the file into MySQL. Using phpMyAdmin, select the 'demo_1.age' table & click “Import”.
- Use the “Choose File” button to select the 'ages.csv' file saved during the previous steps.
- In the “Format of imported file” box:
- Make sure “CSV” is selected.
- Set Fields terminated by = ,
- Leave Fields enclosed by = ”
- Leave Fields escaped by = \
- Leave Lines terminated by = auto
- Set Column names = desc, sort_ord
- The screen should look like this:
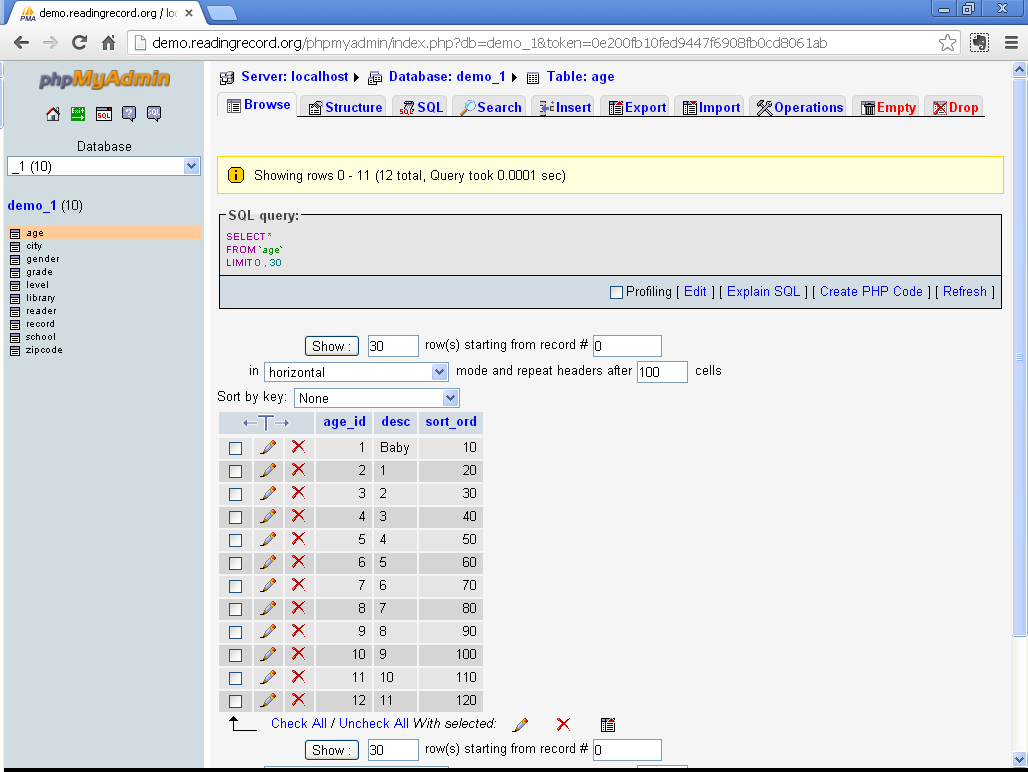
- Select the 'demo_1.age' table & click “Browse”. You should see the imported data:
- Repeat this procedure for the city, gender, library (branch) & school fields.
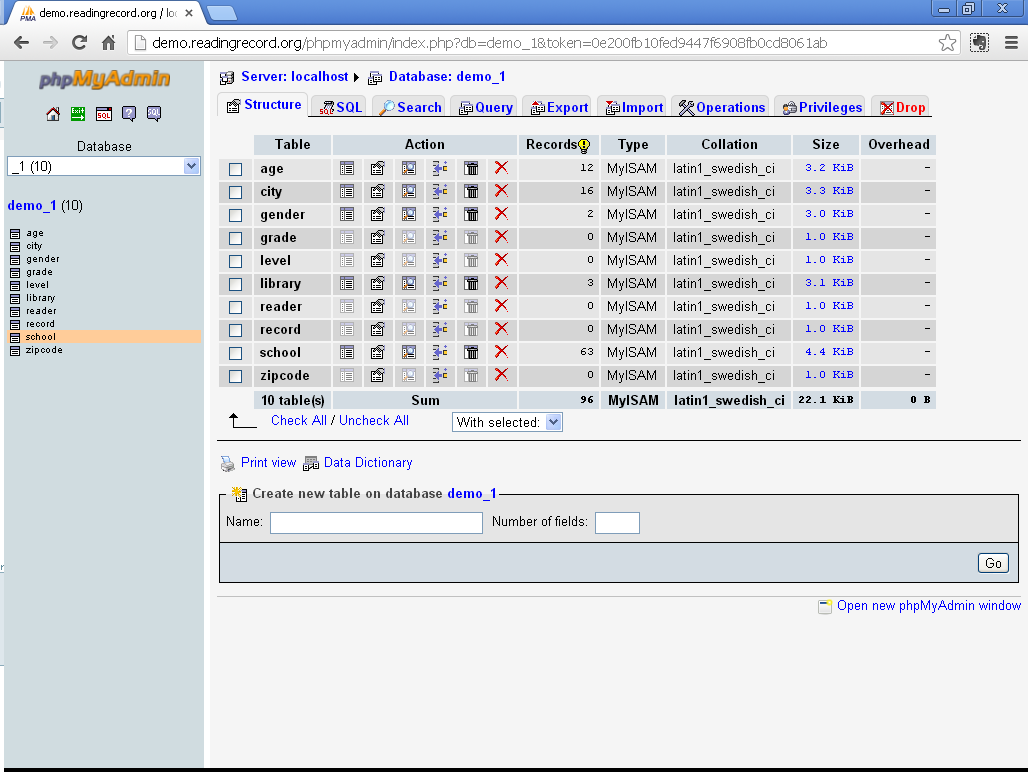
- When finished, select the 'demo_1' database. The following tables should contain records:
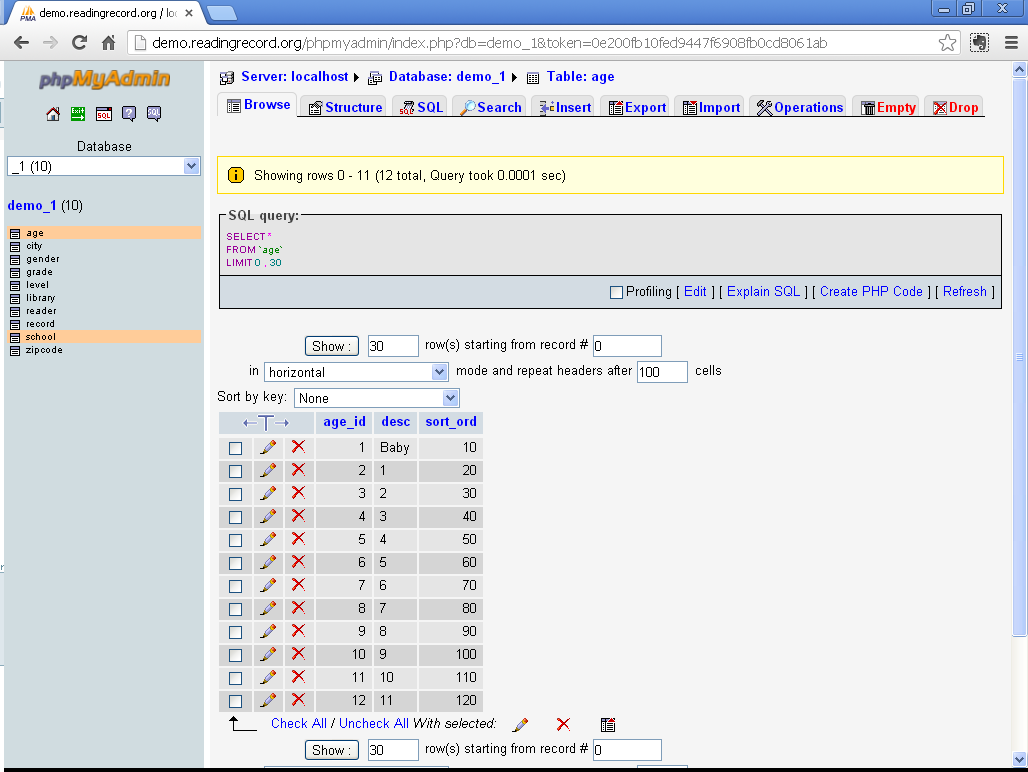
- age = 12
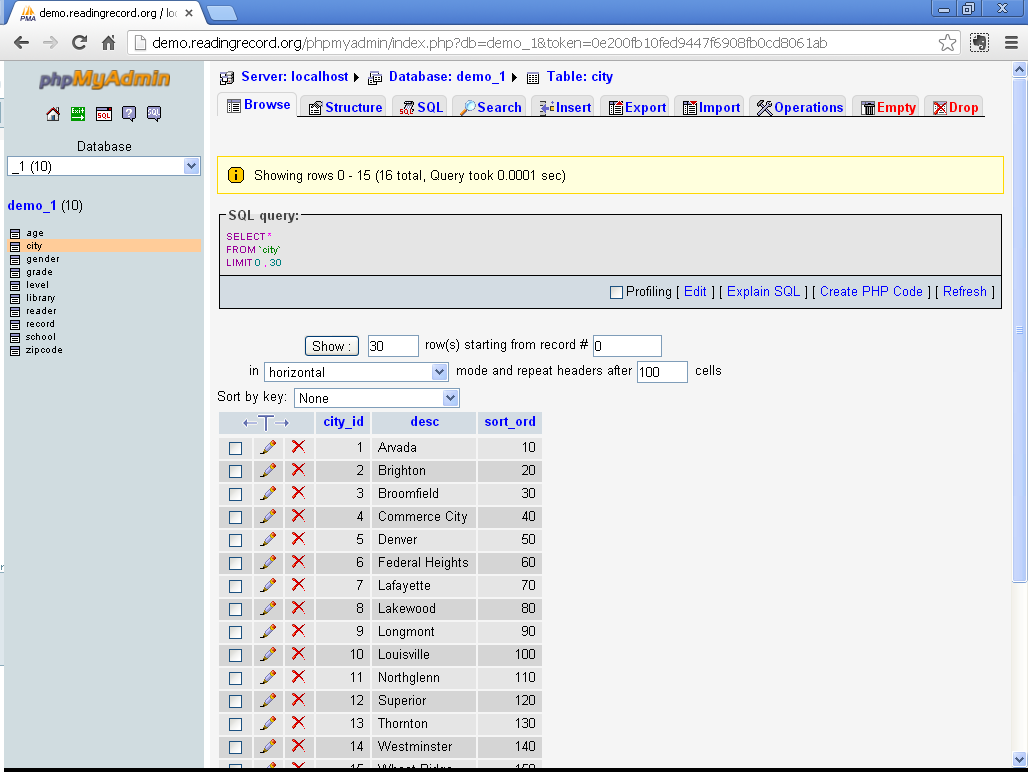
- city = 16
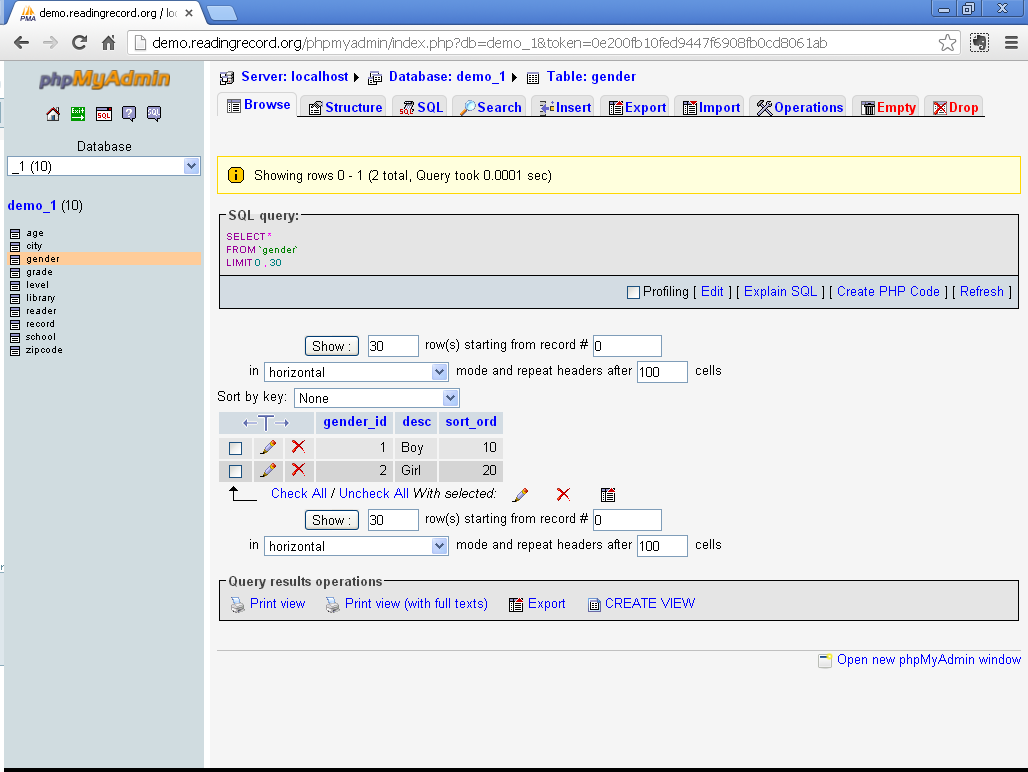
- gender = 2
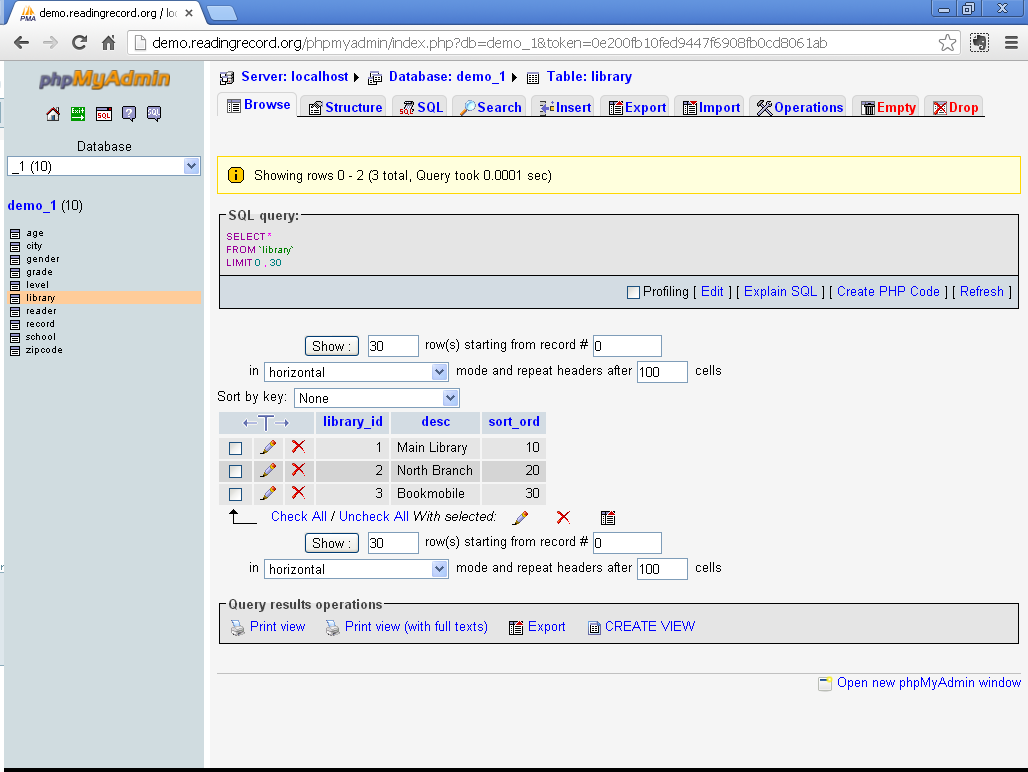
- library = 3
- school = 63
- The screen should look like this:
- Completed age table:
- Completed city table:
- Completed gender table:
- Completed library table:
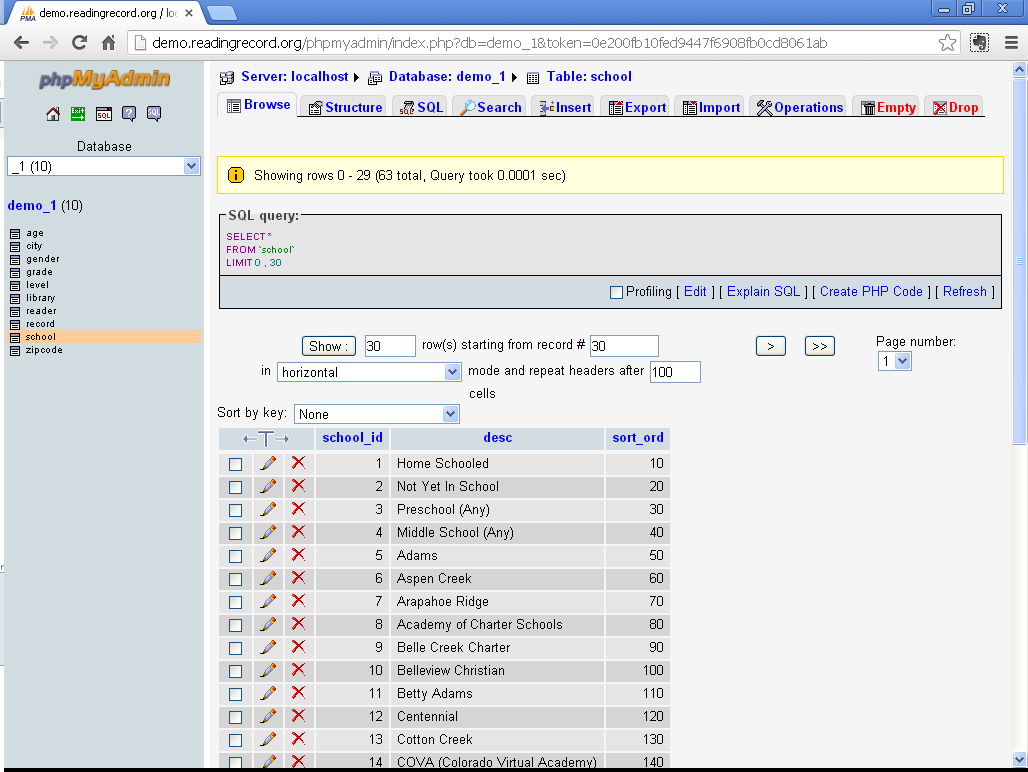
- Completed school table (partial screenshot):
Populate Table For Levels
Lastly we need to populate the table used for levels. The procedure is the same as for drop-down lists with one addition.
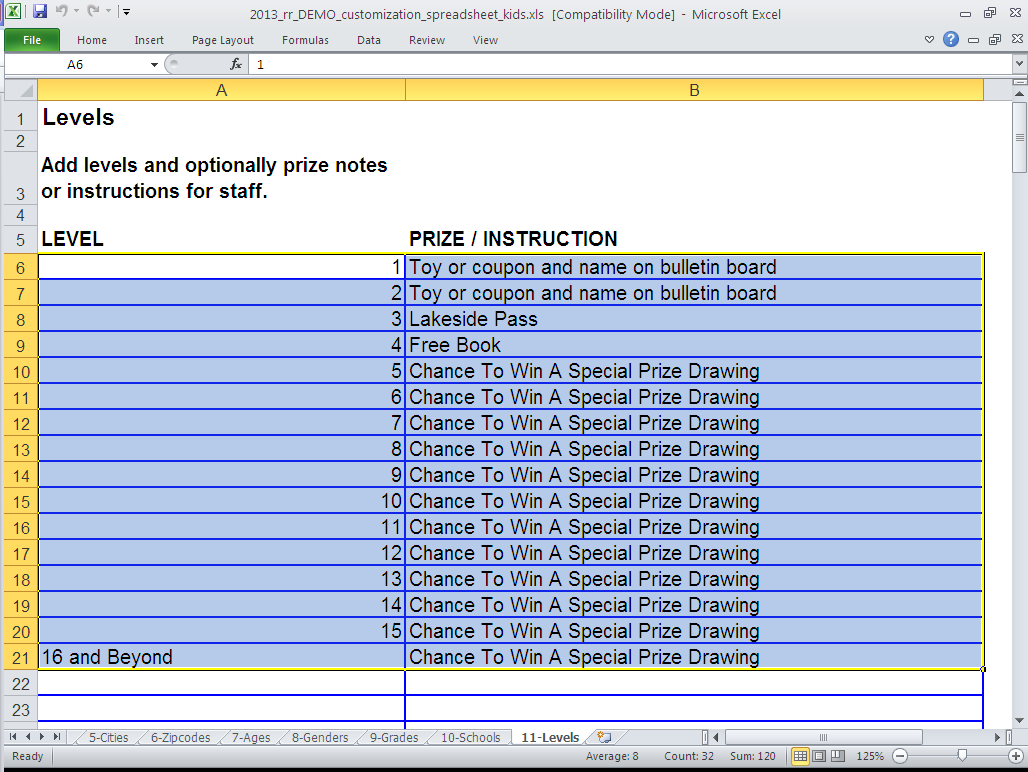
- Convert the 'Levels' spreadsheet tab into CSV data, which can then be imported into MySQL. Select (highlight) all the levels & prize info/instructions listed from the levels tab:
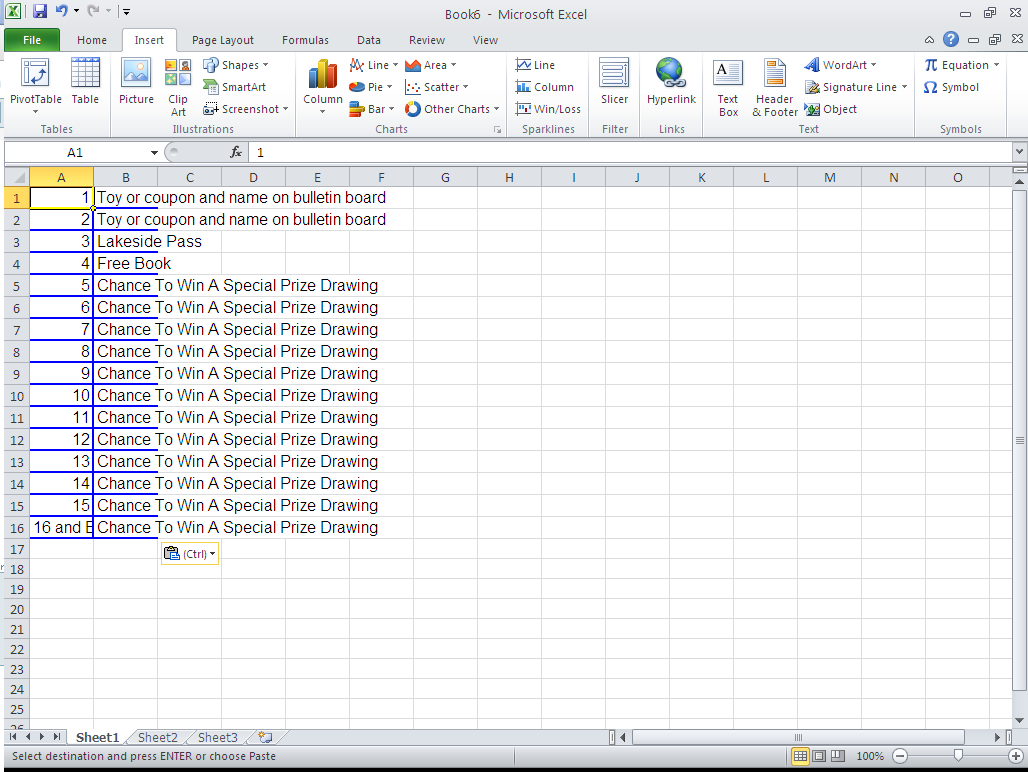
- Copy the selection, then select file → new → blank workbook. Paste the data into the new spreadsheet:
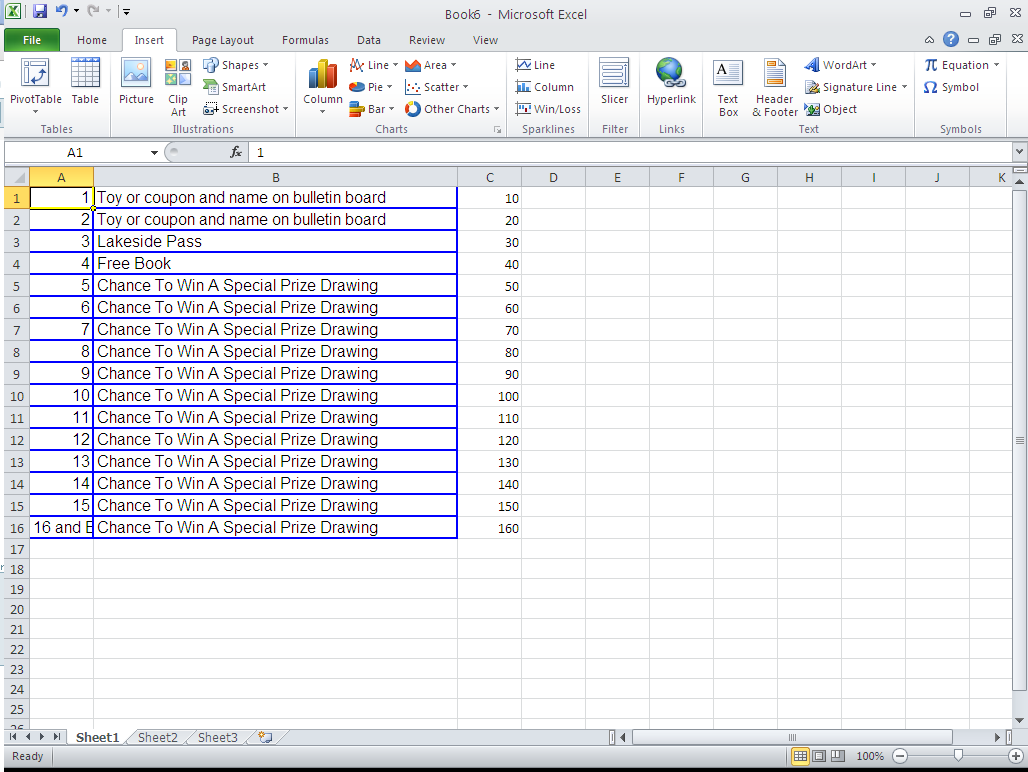
- Levels also require a sort order (more on that later), so we'll add that data to column C (If desired expand column B so you can read the prize info/instructions):
- Select File → Save As. Name the file 'levels' & change the “Save as type:” to “CSV (Comma delimited) (*.csv)”.
- If you receive warnings about multiple sheets, click “OK”.
- If you receive warnings about incompatible features, click “Yes”.
- Close the CSV file
- If you receive warnings about saving the file, click “Don't Save”.
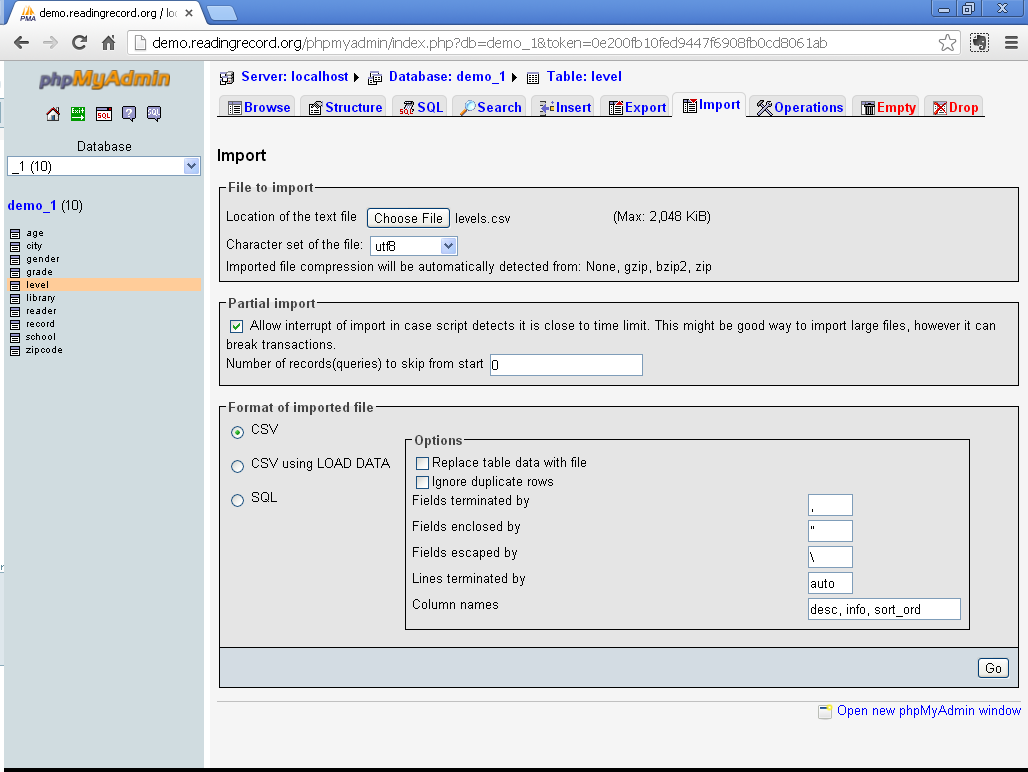
- Now we're ready to import the file into MySQL. Using phpMyAdmin, select the 'demo_1.level' table & click “Import”.
- Use the “Choose File” button to select the 'levels.csv' file saved during the previous steps.
- In the “Format of imported file” box:
- Make sure “CSV” is selected.
- Set Fields terminated by = ,
- Leave Fields enclosed by = ”
- Leave Fields escaped by = \
- Leave Lines terminated by = auto
- Set Column names = desc, info, sort_ord
- The screen should look like this:
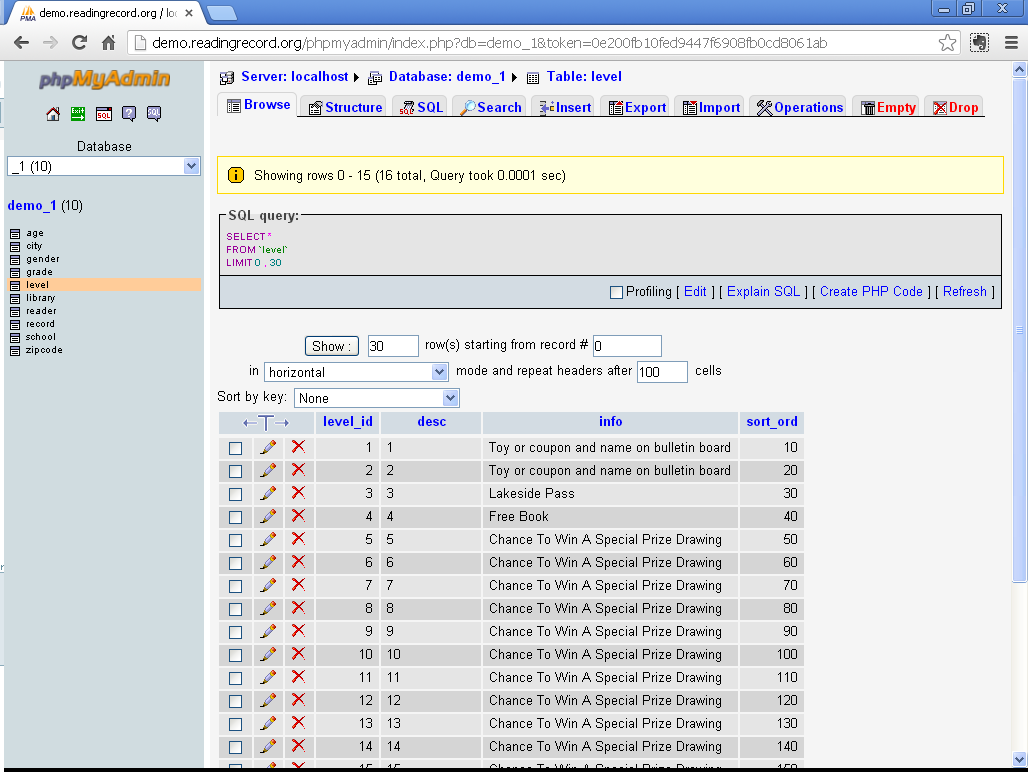
- Select the 'demo_1.level' table & click “Browse”. You should see the imported data (partial screenshot):
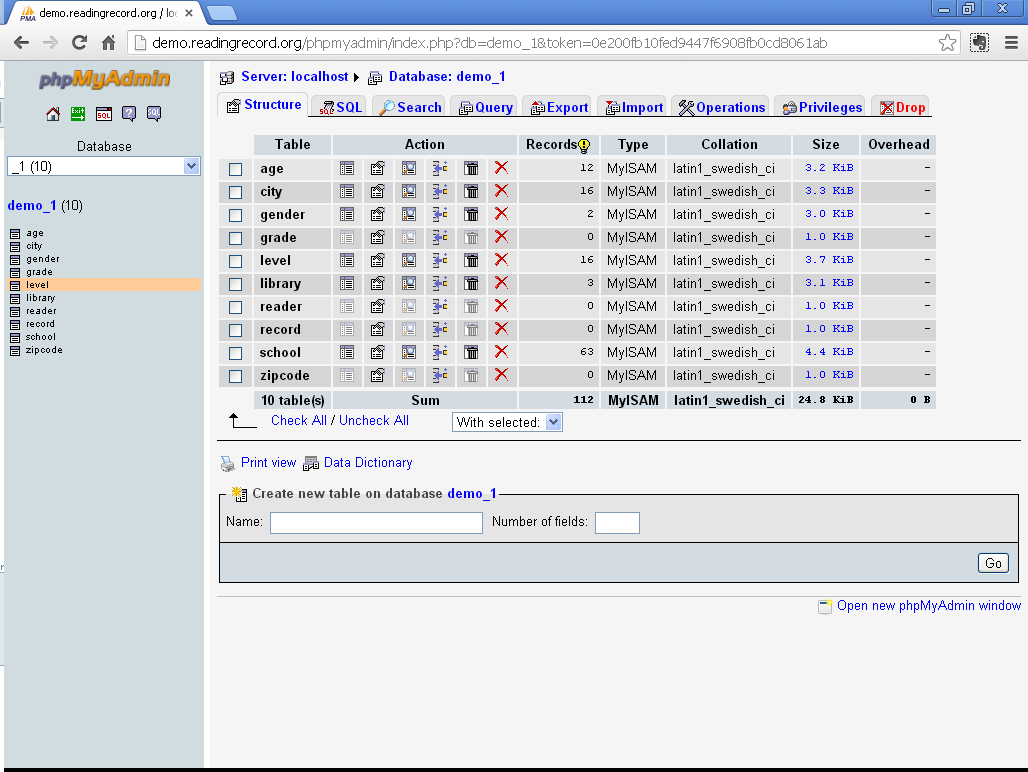
- When finished, select the 'demo_1' database. The following tables should contain records:
- age = 12
- city = 16
- gender = 2
- level = 16
- library = 3
- school = 63
- The finished 'demo_1' database should look like this:
Test The Site
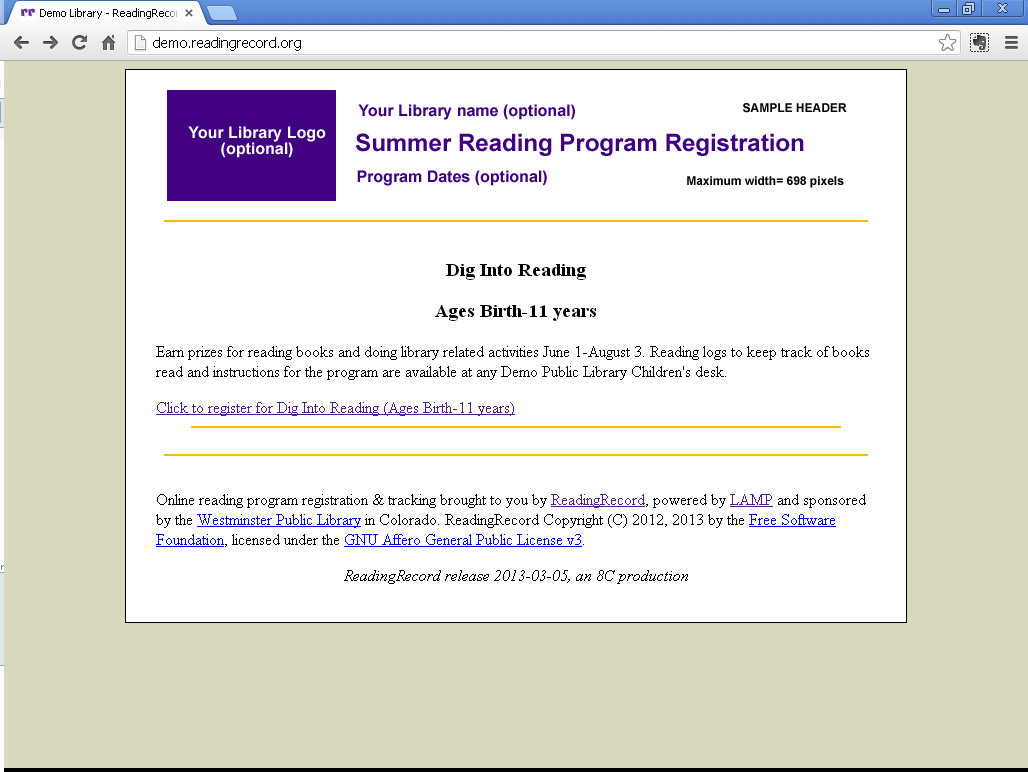
We are finally ready to test our site! [Substitute your library's DNS domain when testing the site, eg: http://demo.mydomain.org/]
- The self-registration index page should look like this:
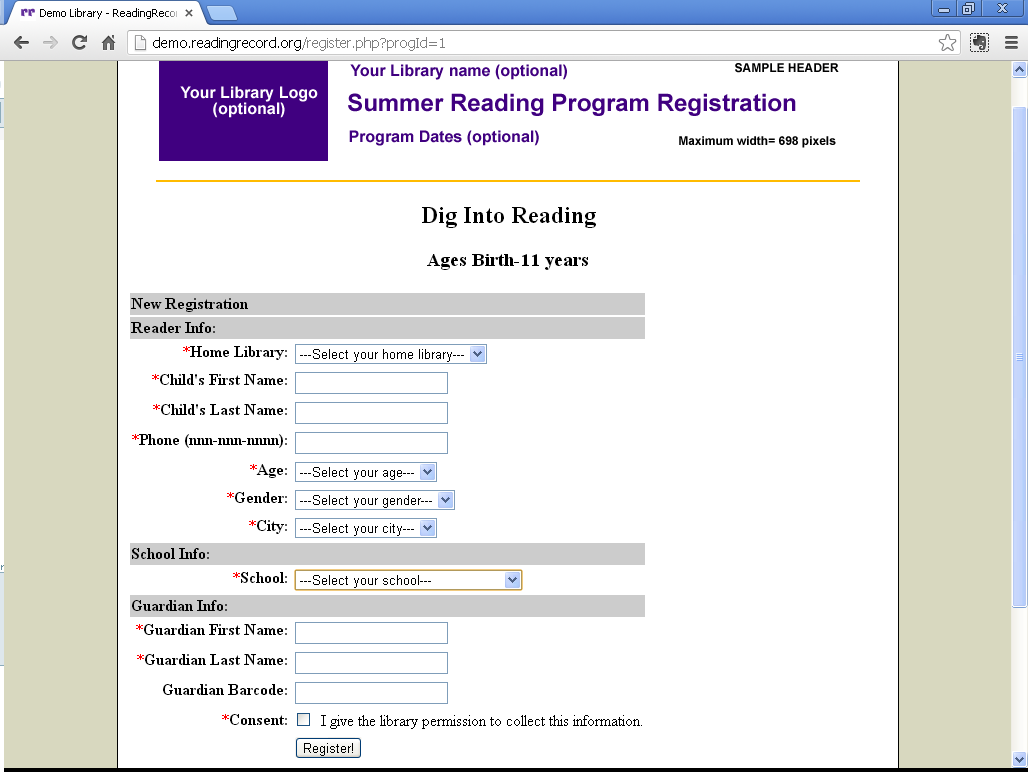
- The self-registration page for the Kids program should look like this:
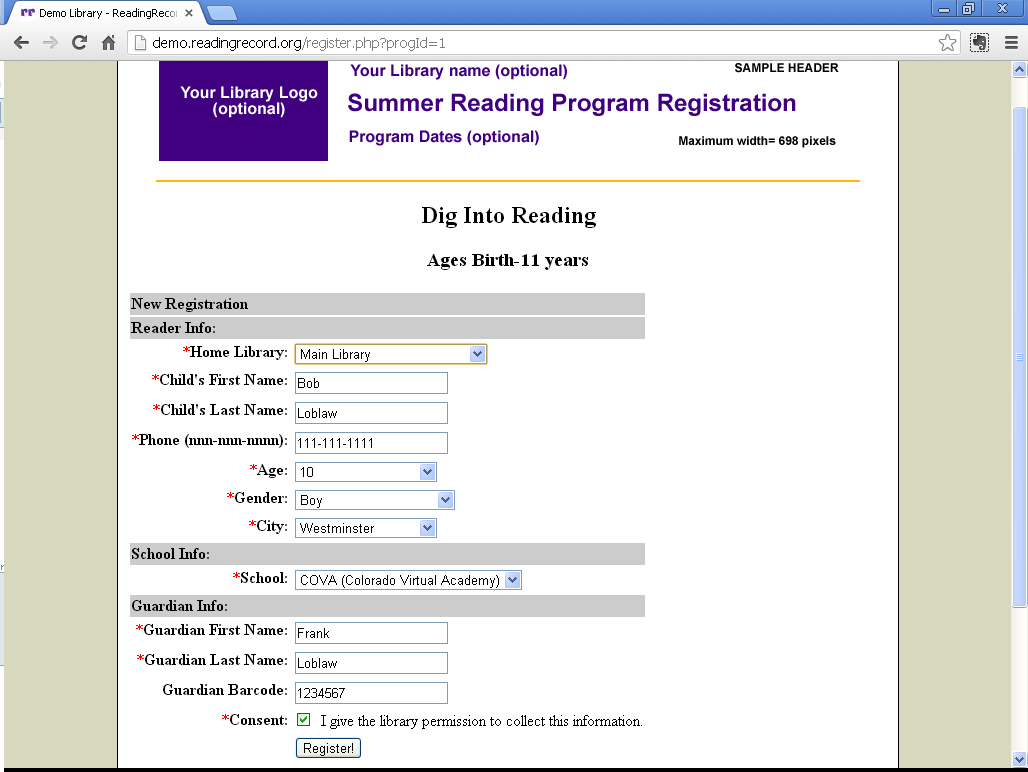
- Double-check that all drop-down boxes are populated correctly & enter a test registration. (If you want to see the various error messages, try leaving a drop-down at the “Select your…” prompt and/or leave a field blank):
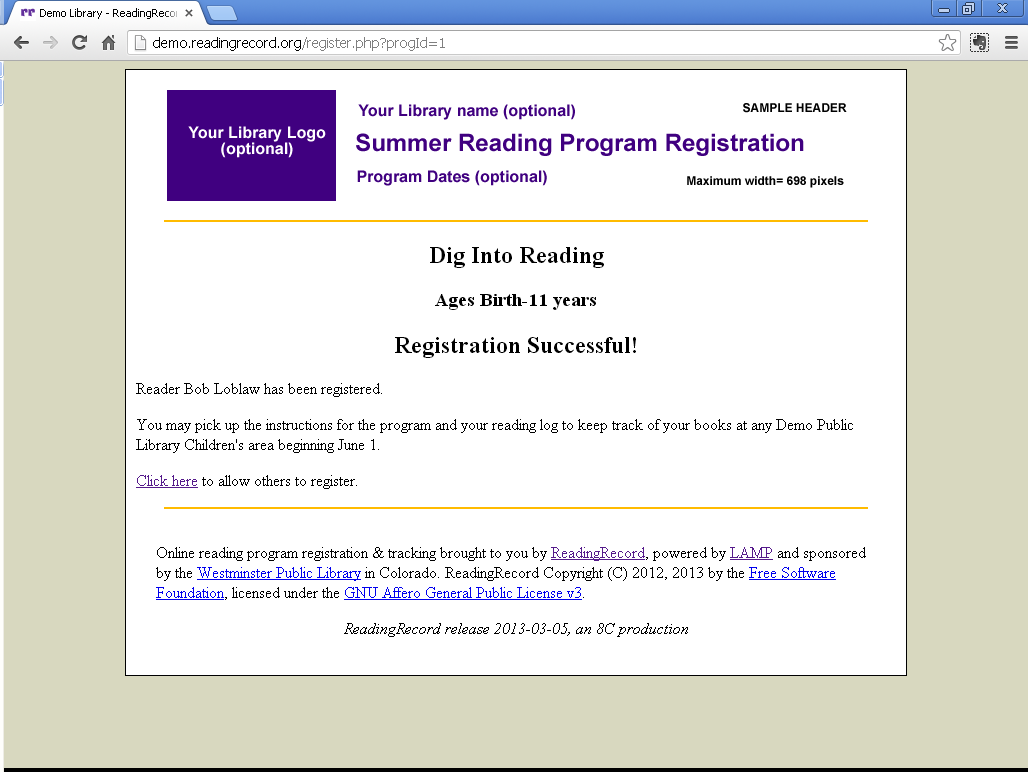
- Click “Register” to see the “Registration Successful!” message:
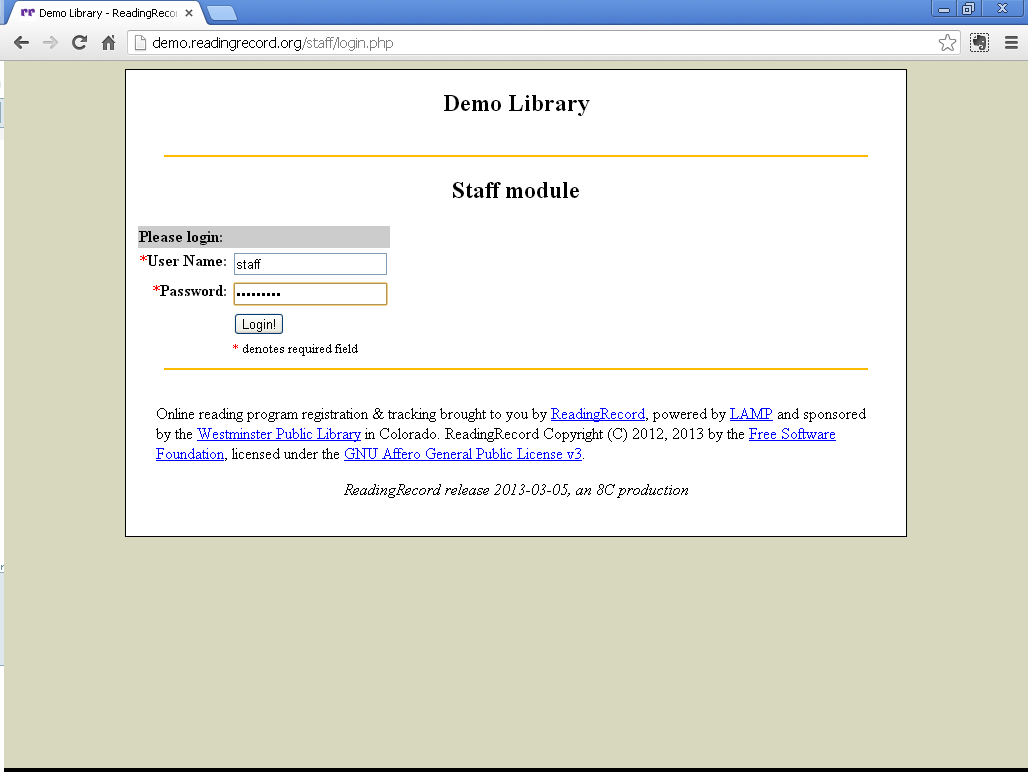
- Login to the staff module via the staff URL. [Again, substitute your library's DNS domain when testing the site, eg: http://demo.mydomain.org/staff/]
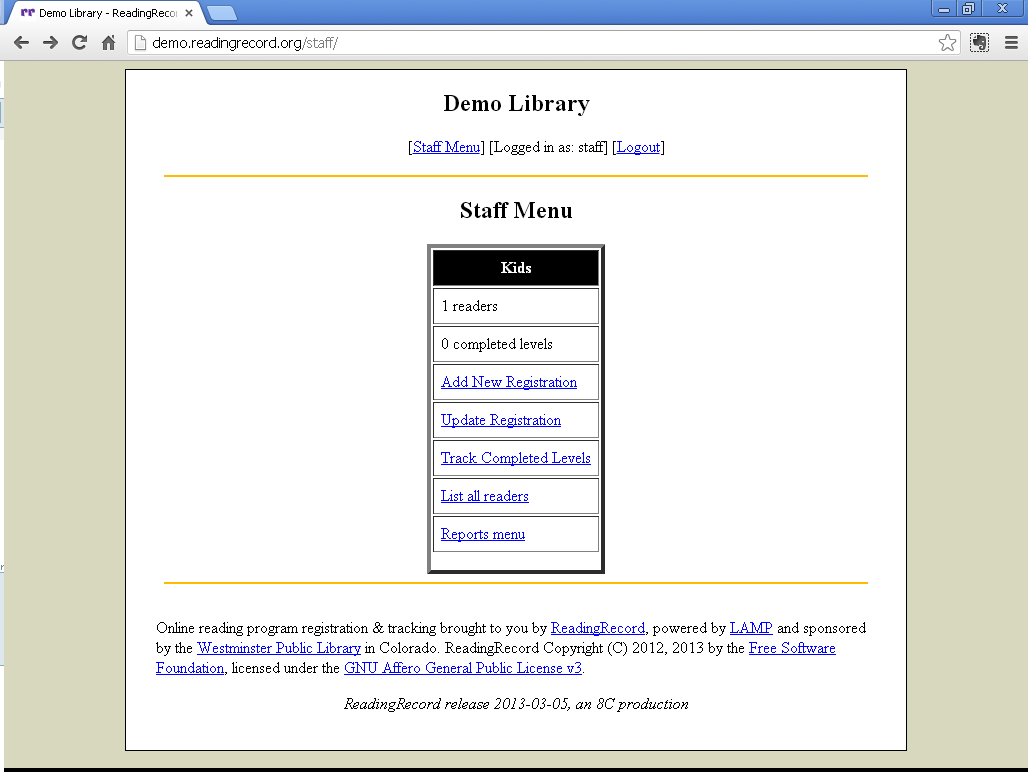
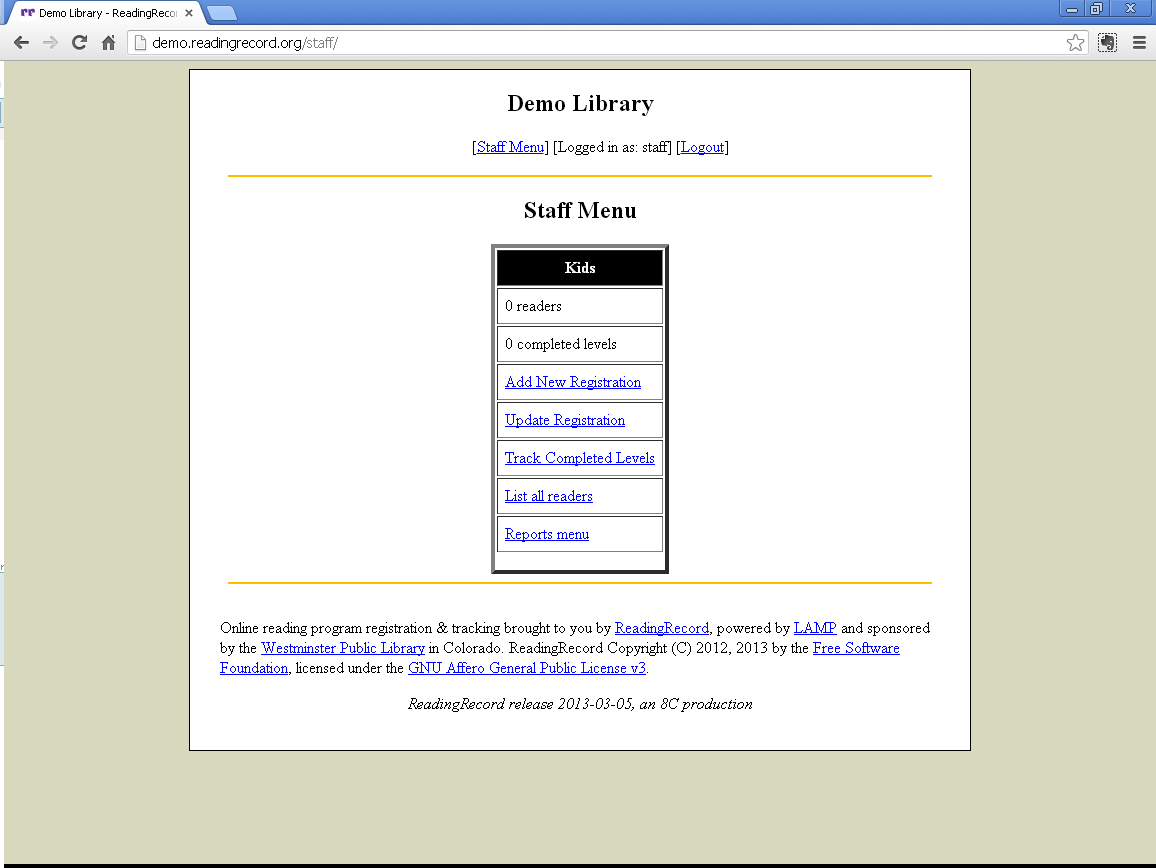
- You should see the Kids program, with 1 reader and 0 completed levels:
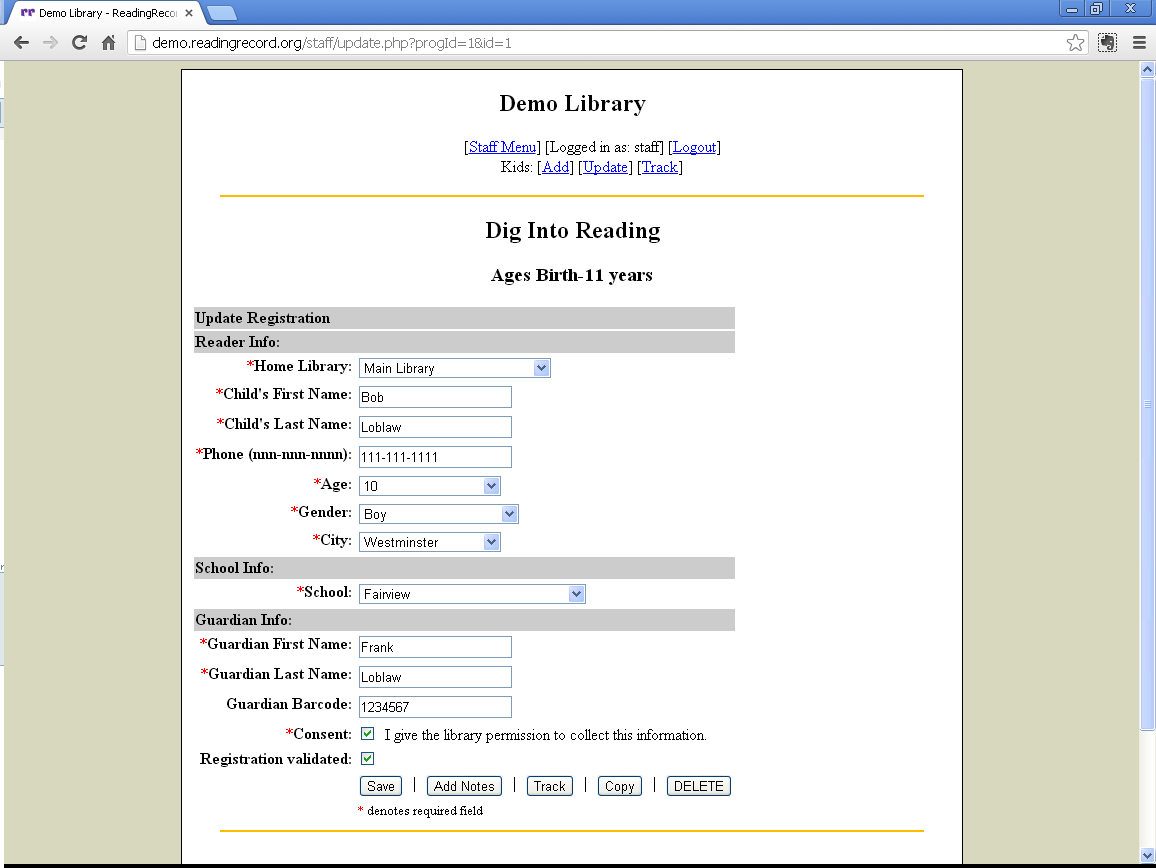
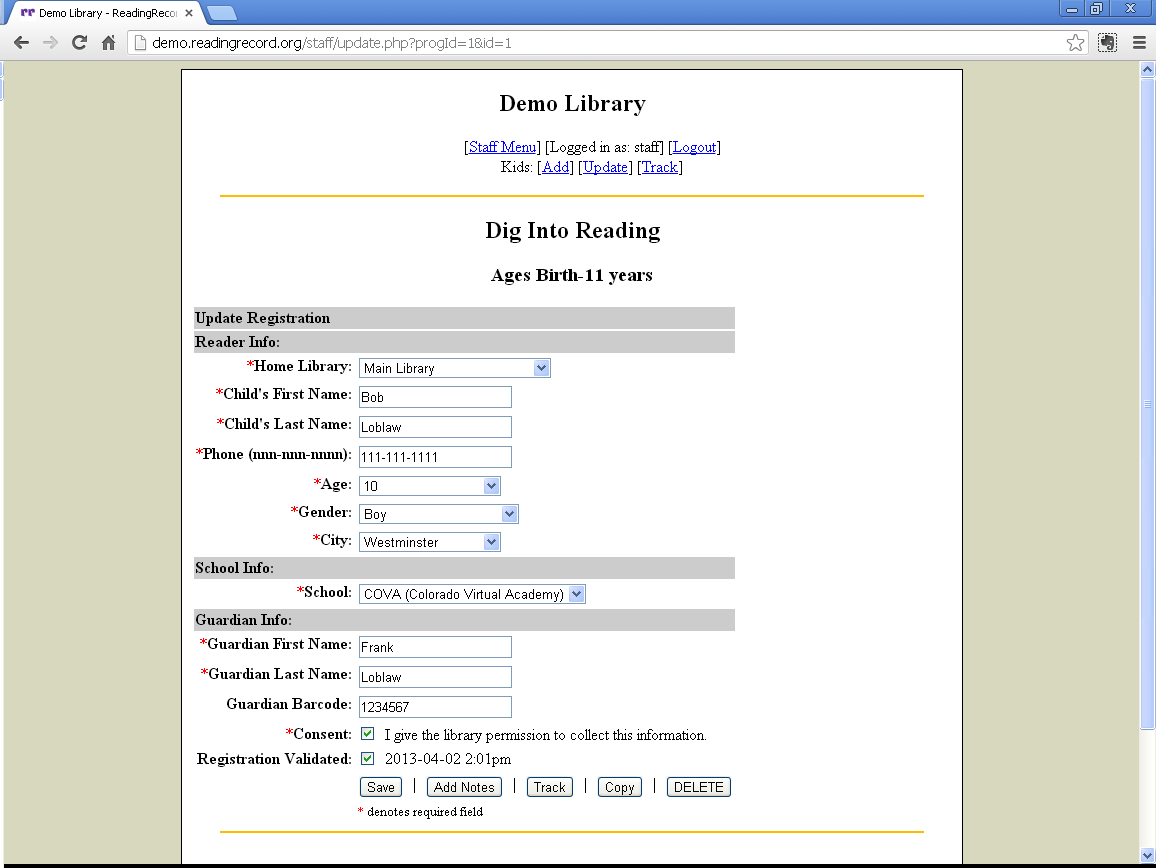
- Display the test registration by clicking “List all readers”. Edit whichever field(s) you'd like & click “Save”:
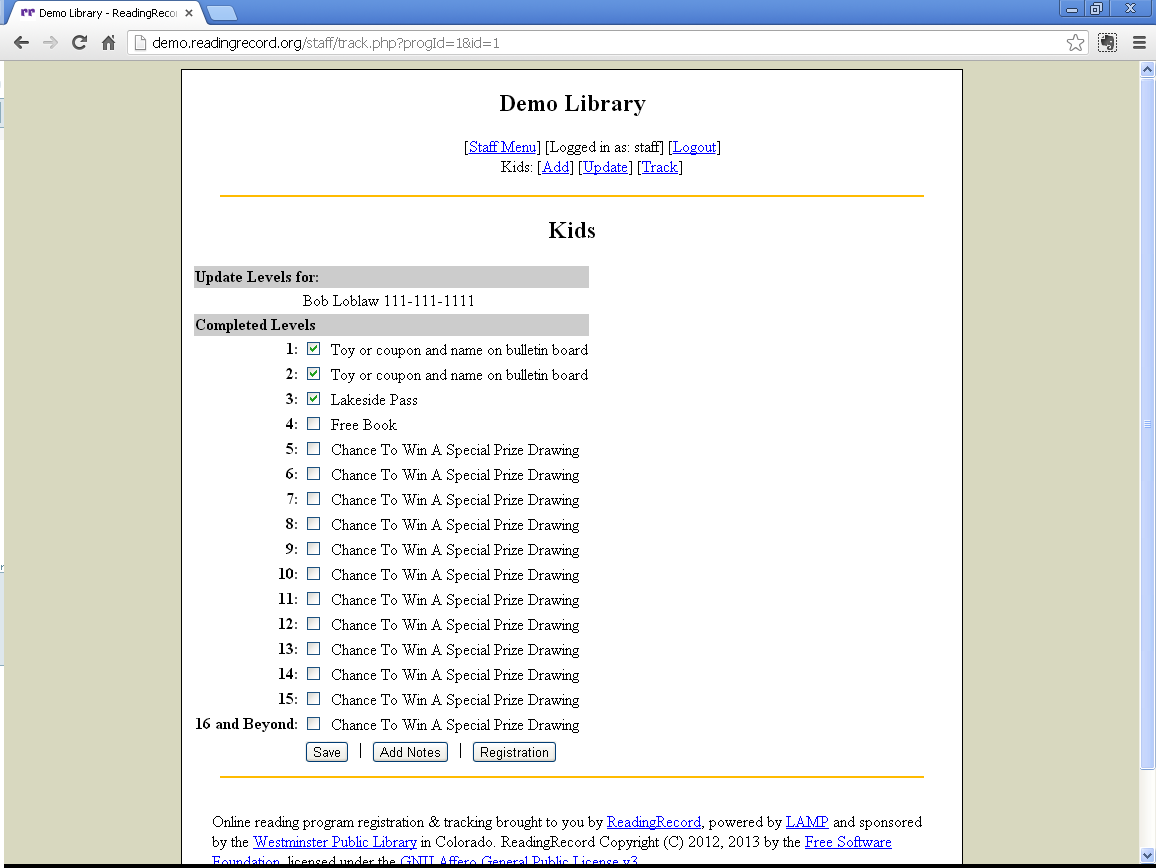
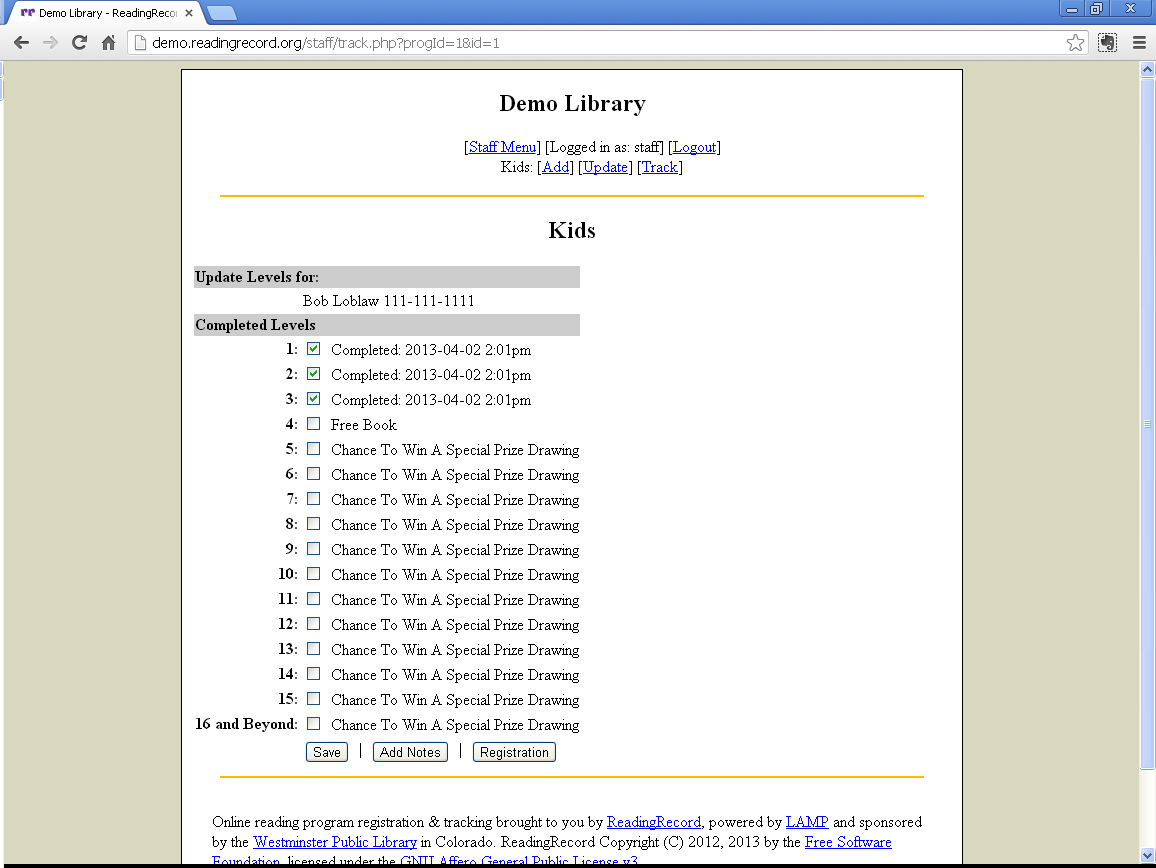
- Now let's check the completed levels screen. Click the “Track” button. Mark some level(s) as complete & click “Save”:
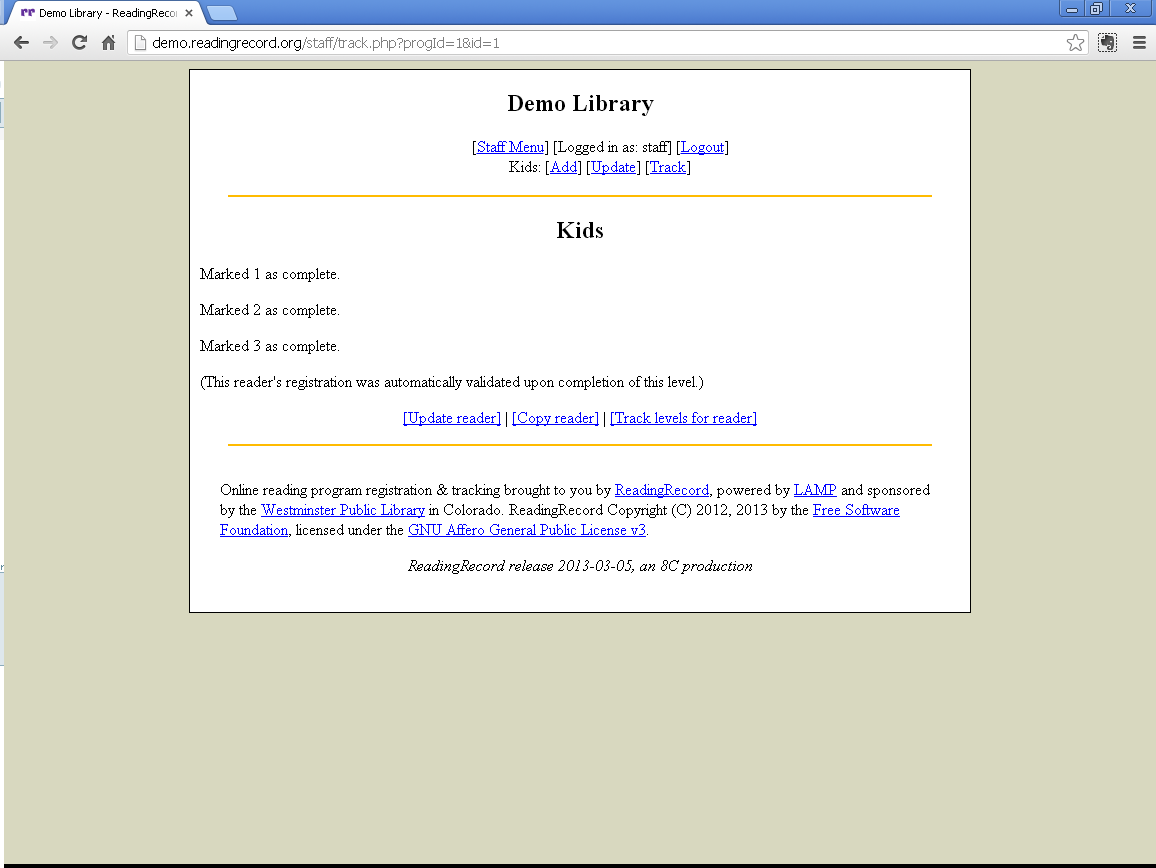
- Click “Track levels for reader” to verify:
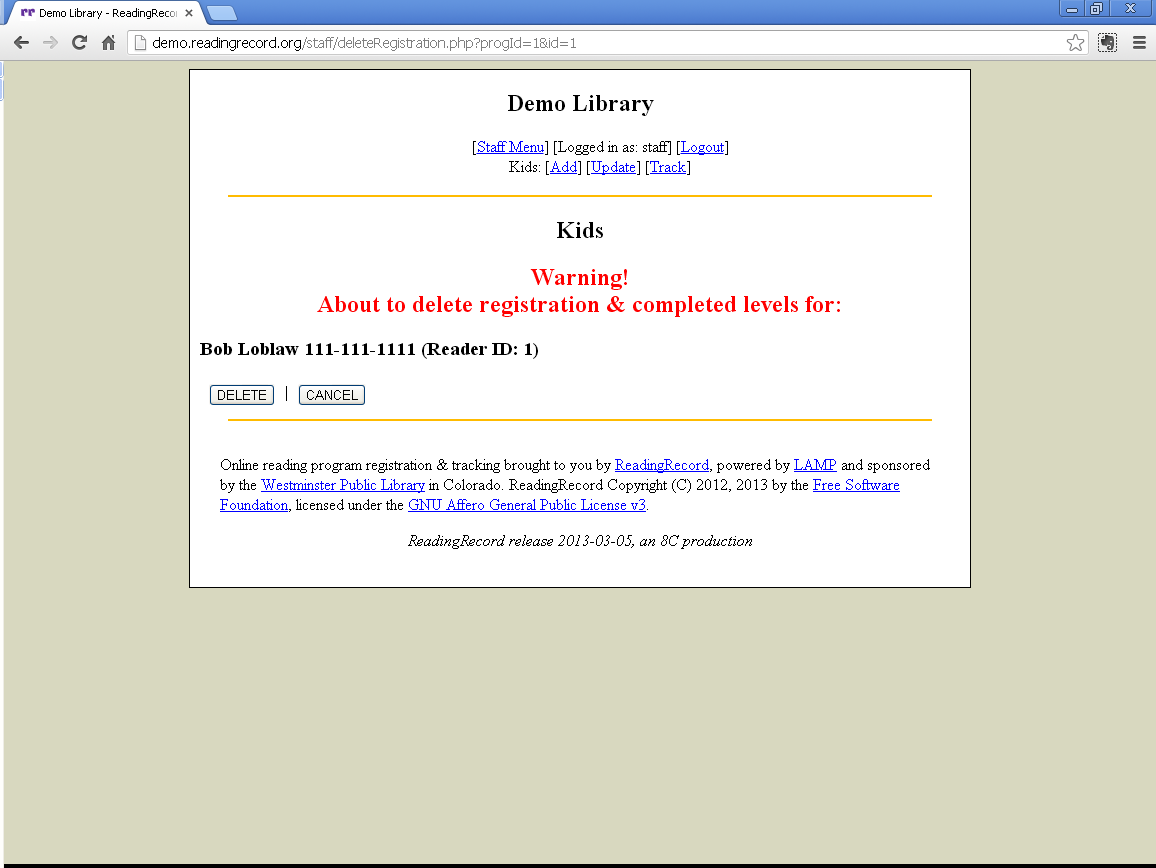
- Click “Staff Menu” to return to the main menu. You should have 1 reader & several completed levels. Lastly we'll make sure we can delete records. Click “List all readers” & select the test registration:
- Click “DELETE”:
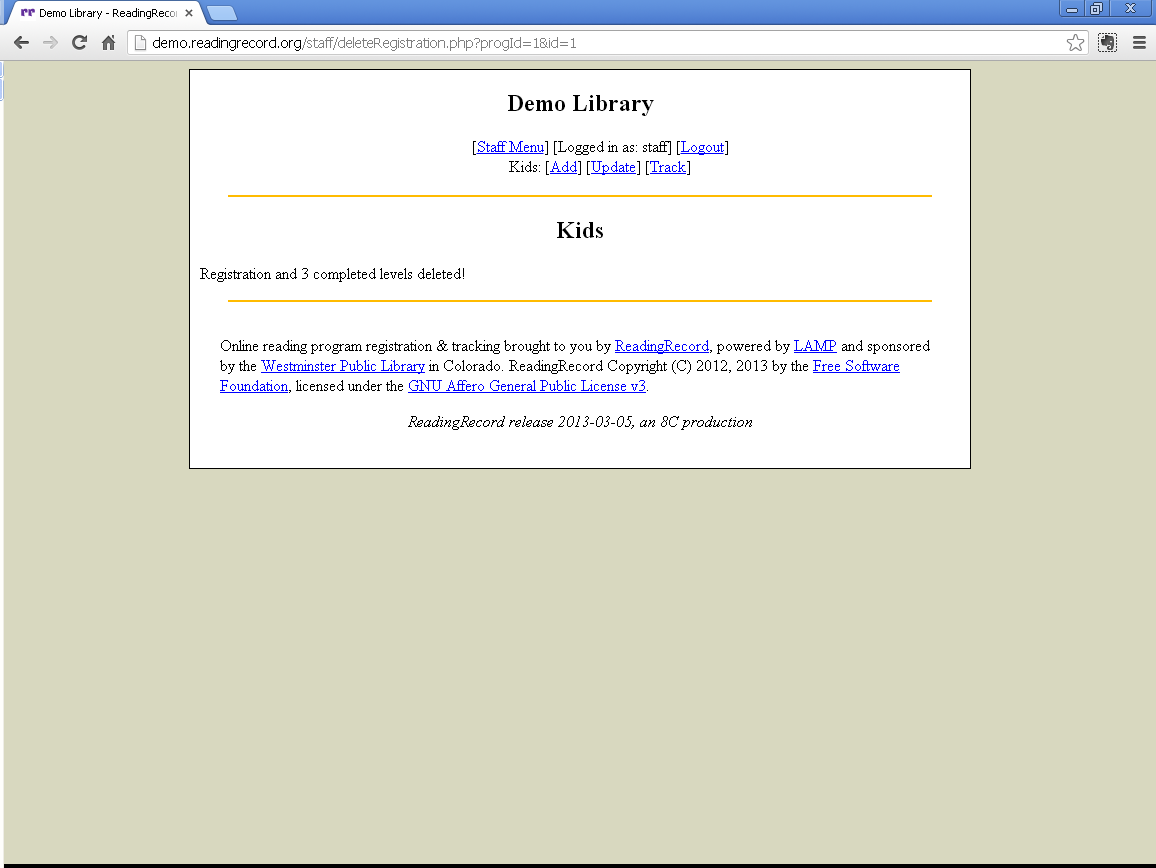
- Click “DELETE” again. The registration & any completed levels will be deleted:
- Return to the Staff Menu. There should be 0 readers & 0 completed levels:
Setup The Other Programs
- Using the procedure outlined above, you may setup the Teens & Adults programs for the Demo Library. (Or not if you feel you've got the hang of it!) We already created the databases & set MySQL permissions, but you will need to enable the programs & set the DB name in the 'demo_config.global' table.
Making Adjustments
One thing I am frequently asked as libraries begin using ReadingRecord is: “Can we make changes to our configuration?”. For example:
- We've decided to track the e-mail address for the teen program after all. Is this possible?
- Oops! We forgot a couple of schools in the kids program. Can they be added?
- We want to move “HOMESCHOOLED” to the top of the schools list for the kids program. Can this be done?
- We'd like to combine the city & zipcode fields for the adults program. How can we accomplish this?
- Help! We messed up the spelling of one of the cities in the adults program.
The answer to all of these questions is “Yes!”. ReadingRecord was designed to be fairly flexible, and became more so in 2013 with the ability to change the label of all fields.
To add the e-mail address for the teen program
- Find the corresponding record in the 'config.program' table.
- Change the value of 'useEmail' to '1'.
- Set the value of 'requireEmail' to '0' (optional) or '1' (required).
- If desired, change the value of 'emailLabel'.
To add a couple of schools to the kids program
- Browse the corresponding 'database_N.school' table & sort by the 'sort_ord' column.
- Determine where the schools should be added & pick unused values for 'sort_ord'. (Eg: if the first school should be added between 'sort_ord' 70 & 80, then use 75'.)
- Click “Insert” & enter the 'desc' (description) and 'sort_ord'. MySQL will automatically assign 'school_id' values.
- Browse the table again & sort by the 'sort_ord' column to verify that the schools are in the correct order. Adjust as necessary.
To move "HOMESCHOOLED" to the top of schools drop-down for the kids program
- Browse the corresponding 'database_N.school' table & sort by the 'sort_ord' column. Note the value of the first school's 'sort_ord' column.
- Edit the record containing “HOMESCHOOL” & change the value of 'sort_ord' to be less than the value noted above. (Eg: if the first school's 'sort_ord' is 10, change HOMESCHOOL's to 5.)
- Browse the table again & sort by the 'sort_ord' column to verify.
To combine the city & zipcode fields for the adults program
There are a couple of ways to solve this problem:
- If still in test mode (self-registration hasn't begun), it may be easiest to simply re-populate either the city or zipcode table with combined city/zip values:
- Empty the 'reader', 'record', 'city' & 'zipcode' tables to ensure no invalid data.
- Disable the 'zipcode' field (we'll use the 'city' field).
- Re-populate the 'city' table using the instructions earlier in this document with combined “City, Zipcode” records:
- Broomfield, 80020
- Broomfield, 80021
- Westminster, 80030
- Westminster, 80031
- You may also wish to change the label of the 'city' field to something like “City, Zipcode”.
- Enter a couple of new registrations to verify.
- If self-registration has already begun, things get a bit trickier. In this case I would:
- Change items in the 'city' table to include city & zipcode, adding additional records as necessary & adjusting the 'sort_ord'. Do NOT change the 'city_id' column, doing so will make a mess of your data!
- Fix existing registrations by updating the 'city' field to reflect the correct city & zipcode.
- Disable the 'zipcode' field and (optionally) empty the 'zipcode' table. (You will need to leave the zipcode field enabled long enough to fix existing registrations.)
To fix the typo in the city drop-down of the adults program
- Browse the correct 'database_N.city' table.
- Fix the 'desc' column of the corresponding record.
In all cases, the changes take effect immediately. No need to logoff, close the browser, etc.
Things ReadingRecord can't do
- One thing ReadingRecord (mostly) can't do is: “Can we add new field X?”. ReadingRecord runs as a cloud-based, hosted solution. This means that all libraries running on the same server are running exactly the same software. Changing your site would change everyone's site. Trying to support custom changes for more than a few libraries would be very time-consuming.
- One possible solution would be to re-purpose an unused field. By changing the label you may be able to create your own “custom” field.
- New features do get added to ReadingRecord on a semi-regular basis. If you have an idea or request, please consider posting it to the ReadingRecord Google group for discussion.
- If accepted, it will be added to the wishlist and become a feature at some point.
- Sponsorship of a particular feature may also be possible, if interested please contact me directly.
- Lastly, since ReadingRecord is open source, you can download it & make changes for yourself. These changes may also be accepted into the official release, meaning everyone would benefit.
Getting Ready For Go Live
Once all programs have been setup & tested, perform the following tasks before self-registration starts:
- Set the value of 'indexStart' in the 'config.global' table to match the earliest date self-registration begins (programs can have different self-registration start/end dates).
- For each program, set the value of 'regStart' in the 'config.program' table to the date self-registration should start. (Patrons will see a failure message before this date, but access to the staff menu is not affected).
- Clear all test registrations & completed levels from all programs by doing one of the following:
- Deleting each registration & corresponding completed levels manually via the staff menu.
- Use phpMyAdmin to EMPTY the 'reader' & 'record' tables. Be sure to select the correct table & choose EMPTY (trashcan icon) not DROP (red X icon).
Tips, Tricks & Warnings About Drop-down Fields & Levels
About '_id' & 'sort_ord' columns
By now you may be wondering: “Why do tables used to populate drop-down fields & levels have '_id' & 'sort_ord' columns?”
id columns
One thing I learned from all those years of hanging around catalogers (Thanks Judy Houk - I miss you!) is the value of “authority controlled” fields:
- They require less storage in the database - the BIB record contains a pointer (ID) to the authority record (eg: Author), rather than storing the same exact author information in each BIB record.
- They are much easier to update - by changing the authority record (eg: adding birth & death dates to an author record), every BIB record using that particular authority record is instantly updated. No re-indexing & no manually changing every BIB record. In fact, no changes the the BIB records at all, since only the authority record was changed.
- Better data integrity - No concerns about typos, inconsistent use of abbreviations, punctuation, etc. If the authority record is correct, all BIB records using the authority record are correct. If incorrect, fixing the authority record fixes the BIB records. This also makes reports much more organized.
Drop-down lists in ReadingRecord work much the same way:
- Each record is assigned a unique ID (eg: the 'city_id' column in the 'city' table).
- The 'city_id' is stored in the reader's registration (the 'reader.city_id' column to be specific), rather than the actual city name.
- Typo in a city name? Fix the 'desc' column in the 'city' table (authority record) & the 'reader' record (BIB record, to continue the analogy) of all readers with that city is instantly fixed.
Make sense?
sort_ord columns
Librarians like options, and to be able to change their minds about those options. This is not a bad thing, but can sometimes complicate things. One thing I learned from a number of ILS migrations (Yes, I still have hair! ![]() ) is that sometimes “sort ascending” and “sort descending” aren't quite enough.
) is that sometimes “sort ascending” and “sort descending” aren't quite enough.
The 'sort_ord' column does just what the name implies - determines the sort order of items in drop-down lists & levels:
- Want your schools sorted alphabetically? Put them on the spreadsheet in order & that's what you'll get.
- Prefer to group & alphabetize by middle school & then high school? Put them on the spreadsheet that way.
- Forgot to include “HOMESCHOOLED” and want it at the bottom? Easy to fix using the 'sort_ord' column.
- Later decide that you need “NOT LISTED”, “NOT IN SCHOOL” at the top and that “HOMESCHOOLED” should really be there instead of the bottom? The 'sort_ord' column can fix that too.
Tips & Warnings
- Delete records in “authority control” tables, including:
- age
- city
- gender
- grade
- level
- library
- school
- zipcode
- Change the value of any column ending in '_id'.
Doing so can mangle your data. You have been warned!
Now that that's out of the way, let's look at some instances where this might be necessary & how to safely go about doing so:
I need to add records between two existing records, but there not enough unused 'sort_ord' values
If you've gone through the process of setting up the Demo Library, you should have noticed that I incremented the 'sort_ord' value by 10 when creating the CSV file for import. This is in case you need to change the sort order and/or add new records after the initial import.
For example, let's say you've setup your own site and the school table currently looks like this in sorted order:
| school_id | desc | sort_ord |
|---|---|---|
| 3 | HOMESHOOLED | 5 |
| 4 | NOT IN SCHOOL | 7 |
| 1 | Avista Elementary | 10 |
| 2 | Bradburn Elementary | 20 |
You need to add the following schools, but there aren't enough unused 'sort_ord' values (which must be unique) between “NOT IN SCHOOL” & “Avista Elementary”. You have 3 schools to add but only 2 available sort_ord values - 8 & 9:
- Abel Elementary
- Accel Academy
- Apex Learning Center
It looks as if all 4 records were part of the initial import, but that “HOMESCHOOLED” and “NOT IN SCHOOL” were originally at the bottom of the list. In this case there isn't any need to delete any records or change any IDs, but we need to “shift” Avista's 'sort_ord' before we add the new schools. Using phpMyAdmin, change Avista Elementary's 'sort_ord' to 15, the school table now looks like this:
| school_id | desc | sort_ord |
|---|---|---|
| 3 | HOMESHOOLED | 5 |
| 4 | NOT IN SCHOOL | 7 |
| 1 | Avista Elementary | 15 |
| 2 | Bradburn Elementary | 20 |
Now add the new schools, using the following 'sort_ord' values. Remember that MySQL will automatically fill in the 'school_id' column:
| desc | sort_ord |
|---|---|
| Abel Elementary | 9 |
| Accel Academy | 11 |
| Apex Learning Center | 13 |
When sorted by 'sort_ord', the completed table should now look like this:
| school_id | desc | sort_ord |
|---|---|---|
| 3 | HOMESHOOLED | 5 |
| 4 | NOT IN SCHOOL | 7 |
| 5 | Abel Elementary | 9 |
| 6 | Accel Academy | 11 |
| 7 | Apex Learning Center | 13 |
| 1 | Avista Elementary | 15 |
| 2 | Bradburn Elementary | 20 |
You could use sequential numbers for the new schools, but the example above leaves space for one school between each new school. If you later need to add more schools between “Accel Academy” & “Apex Learning Center”, repeat the “shift” procedure until you have enough unused 'sort_ord' values. You can also shift the 'sort_ord' of records before the insertion point.
Success! We added new schools in the correct order without deleting any records from the school table or changing any 'school_id' values.
I need to change a school's name & sort order
To expand on our previous example, let's say the “Accel Academy” has changed its name to “Colorado Virtual Academy”. You might be tempted to add a new school to the table with a 'sort_ord' value that puts it after “Bradburn Elementary”, then delete the record for “Accel Academy”:
| school_id | desc | sort_ord |
|---|---|---|
| 3 | HOMESHOOLED | 5 |
| 4 | NOT IN SCHOOL | 7 |
| 5 | Abel Elementary | 9 |
| 7 | Apex Learning Center | 13 |
| 1 | Avista Elementary | 15 |
| 2 | Bradburn Elementary | 20 |
| 8 | Colorado Virtual Academy | 25 |
Doing so would violate rule #1: NEVER delete records in “authority control” tables. This would orphan records in the 'reader' table where “Accel Academy” (school_id=6) was selected. More specifically, these records would have an non-existent value for 'school_id', which would make statistics incomplete and exported CSV data incorrect.
A better solution would be to simply change the 'desc' & 'sort_ord' fields of the “Accel Academy”. This way you avoid invalid data & incomplete statistics, plus all readers formerly attending “Accel Academy” have automatically been updated to “Colorado Virtual Academy”.
| school_id | desc | sort_ord |
|---|---|---|
| 3 | HOMESHOOLED | 5 |
| 4 | NOT IN SCHOOL | 7 |
| 5 | Abel Elementary | 9 |
| 7 | Apex Learning Center | 13 |
| 1 | Avista Elementary | 15 |
| 2 | Bradburn Elementary | 20 |
| 6 | Colorado Virtual Academy | 25 |
I need to delete an invalid zipcode
After go live, staff reports an invalid zipcode, 80931:
| zipcode_id | desc | sort_ord |
|---|---|---|
| 1 | 80030 | 10 |
| 2 | 80031 | 20 |
| 3 | 80931 | 30 |
| 4 | 80221 | 40 |
| 5 | 80224 | 50 |
You run the zipcode report & discover that some registrations are using this zipcode. You decide to “merge” this with the correct zipcode of 80031. There are a couple of ways to do so:
- Use phpMyAdmin to select & edit all records in the 'reader' table with 'zipcode_id' = '3'. The syntax would look something like:
SELECT *
FROM `reader`
WHERE `zipcode_id` = '3'
- Use phpMyAdmin to mass update all records in the 'reader' table with 'zipcode_id' = '3' to 'zipcode_id' = '2'. Use this option with caution. SQL syntax can be quite powerful (and dangerous) for the inexperienced. The syntax would look something like:
UPDATE
`reader`
SET `zipcode_id` = '2'
WHERE `zipcode_id` = '3'
Once all records have been updated, delete the invalid zipcode.
What if self-registration hasn't begun and I need to make major changes?
If your site is still in test mode and you need to make major changes, it can be easier to simply start over. Let's say you need to completely re-do the school table. Your library district just grew and you find your service area now includes many new schools. Additionally, staff testing your site discover some missing schools & some that have changed names. In this case I would:
- Have staff re-do the schools tab of the customization form & resubmit it.
- Empty (trashcan icon) the school table.
- Use the procedures outlined earlier in this document to convert the spreadsheet data to CSV data, then re-import the new data.
- Empty the 'reader' & 'record' tables to clear test data of any invalid records.
- Have staff enter new test data & verify the new schools.
Navigation
Previous: Install & Configure ReadingRecord | Next: Database schema information

